Overpronation and Orthotics for Runners

In this post I will discuss Overpronation and Orthotic for runners.

During my 30 years of practice as a sports physical therapist, I encountered many runners with afflictions that they attributed to overpronation or flat feet: plantar fasciitis, shin splints, tendinitis, and knee pain, to name a few. A question that is commonly asked: are orthotics good for plantar fasciitis, shin splints? What if you are a runner and developed those symptoms due to your activity? I do not have a straight answer to that. The foot is the final link of a lower extremity kinetic chain.  Treating solely pronation without assessing the knee, the hip, and the spine, may not necessarily solve the underlying problem. Clinicians occasionally make a pre-judgment error in mistakenly recognizing something they already know and are familiar with as the main cause for a symptom. Overpronation is a well-known abnormality not only to physical therapists and other clinicians but to trainers, running coaches, and running shoe salespeople in a local sporting good store.  Running analysis set up in the shoe store often lacks scientific standards. Well-intended advice for a particular running shoe or orthotic may not lead to the desired benefit.

What running experts say about orthotics.

Said Aouita, a famous Moroccan-born runner, who won the 50000-meter race in the 1984 Summer Olympics and set many world records in shorter distances admitted to the French newspaper L’Equipe that fallen arches have been an issue during his entire career. “My only problem is that I have flat feet, which promotes tendinitis”. Aouita had specially created custom shoes that provided the additional support he needed. Supplementing fallen arches with orthotics insoles can better support adjoining ligaments and tendons, one piece of advice Aouita gives to the runners.

Ethiopian athlete Haile Gebreselassie is considered one of the greatest long-distance runner of all times. He set 27 world records, winning two Olympic Gold medals and the Berlin Marathon 4 times in a row.  Running experts had been studying his overpronation and were baffled by it. They recognized his overpronation as a postural deformity. He found a different solution to the same problem that Aouuita experienced: barefoot running.

What is pronation?

Pronation is a shock-absorbing adaptation. Lowering your arch to the ground by inward rolling of your foot.  It allows for the distribution of an impact across your foot and stores the elastic energy released during the push-off. 

In overpronation, the foot arch drops downward and the ankle rolls inward too much.  It continues to roll when the toes should be starting to push off. As a result, you cannot effectively push off.

Do I under or overpronate?

Overpronation and flat feet are often used synonymously, but they are not the same thing. In fact, you can be overpronating, but not have flat feet.

Underpronation is when there is too little inward and downward movement of the foot. Overpronation is more common in runners. Both conditions distribute impact unevenly and may lead to shin splints, stress fractures, plantar fasciitis, Metatarsalgia, and Achilles tendinitis.

How do I stop overpronation when running?

Do you really need to? Overpronation as a cause for foot pain cannot be considered in isolation. Without assessing the running style, joint flexibility, and bone structure of the entire lower extremity, we cannot determine that overpronation is the sole reason for pain. A thoughtful physical therapist should not start fixing pronation. Each runner develops their unique running style.  Changing it may take away a useful adaptation. It may force the runner in an unnatural movement pattern. It will lead to higher energy expenditure and undue stress in other parts of the body.  Further in this article, I will discuss a recently developed ” habitual motion path theory” that supports an argument against treating overpronation by orthotics for runners.

What are the foot orthotics and do they really help?

 Although we focus on orthotics’ usefulness in runners, they are used widely for static corrections. The vast majority of the custom made orthotics are prescribed by the clinician to correct the foot deformity.

An orthotic is a shoe insert that supports the abnormal movement of the foot. It claims to properly align your feet and avoid imbalances by adjusting the angles at which your foot strikes the ground. According to the recently published issue of the American Foot and Ankle Society’s journal https://www.aofas.org/, there was no significant change in incidences of foot problems between the users of custom orthotics and those who wore over-the-counter ones.


Are foot orthotics prescribed too often?

Over the counter, orthotic insole value in North America is $1.2 billion. The price of the shell orthotics is $10-120. This number does not include custom-made or prescription orthotics that can range from $300 to-500.  A clinician makes a cast of your foot and sends it to the lab, where the insole is created. Some insurances cover the cost.

Running is a high impact sport. There is repetitive stress on biological tissues that are often associated with cumulative trauma. Foot and ankle is just a part of a mechanical chain.  It follows the path set up by the joints above it. The Habitual Motion Path Theory states that humans instinctively “choose” an optimal path of lower extremity joint movement. The neural control regulates our movement and directs our motion in the path of least resistance. How we walk and how we run is specific to each individual’s anatomy, soft tissue mechanical properties. In other words, our bodies will find a way to minimize the loading on our lower extremities joints during running.

What is a habitual motion path theory?

According to the habitual motion path theory,  https://www.nature.com/articles/s41598-020-58352-5the runner must generate amplified lower extremity joint movement in order to optimize the load distribution to regions in your lower extremities. Any deviation from the Habitual Motion Path leads to loading to less adopted structures leading to a risk of injury. Neural control of running is adjusted to avoid irreversible injuries such as osteoarthritis. Such a theory is supported by scientific evidence. It was put to test in a recent study performed in Germany in the institute of Biomechanics and Orthopedics. The purpose of this study was to examine how deviation from a natural running path can negatively affect your knees. The subjects had to run for 75 minutes under 3 running conditions in their natural state and with inserts in their shoes either on the inside or outside of the border of the insole. Thus the subjects were forced to run in conditions that deviated from their natural path. Then the MRI of cartilage volume measured after the exercise demonstrated a statistically significant decrease in the knee cartilage volume in the runners who ran with inserts in their shoes.

Physical Therapy for the runner’s injury in Brooklyn

Although orthotics have their value for correcting foot deformity, I would use caution in prescribing one for the runner who was diagnosed with overpronation. If you were diagnosed with foot pain, plantar fasciitis, shin splint, or tendinitis the first step in your treatment at Park Sports  https://parksportspt.com/staff/would be a thorough functional evaluation that may include a detailed running analysis https://parksportspt.com/running-analysis-how-you-run-and-walk-matter-a-lot/. Orthotic services are available at our Williamsburg location, and are offered only to those patients who are most likely would benefit from them. In conclusion: overpronation cannot be diagnosed by simple observation. Many other clinical factors must be taken into consideration. Please visit our services website for more information.

Boris Gilzon, PT, DPT, OCS, CHT


7 Winter Exercise Tips That Will Help You Stay Active This Season

We know that staying fit over the winter means you’re more likely to spend time exercising in the gym or at home than outside. However, there are benefits to exercising outdoors in the winter that the gym can’t provide – and with the pandemic still not under control, the gym might not be an option. Being outside exposes you to the sun, which will help boost your mood, increase your vitamin D levels, and enhance your immune system. Plus, with the variety that outdoor exercise can provide, you might even burn more calories. Let’s dive right in with winter exercise tips to help you stay active and in shape this winter.

Embrace Winter With These Winter Exercise Tips

Though it’s often tough to head outside on rainy and snowy days, we’ve got some winter exercise tips to help you stay warm and injury-free in the colder weather.

Wear The Right Clothing


Wearing the right clothing might be the most crucial winter exercise tip we can give. The quickest way to lose body heat is to get wet. Water is an efficient heat conductor, which means it moves heat away from your body to the cold air outside, quickly leaving you cold and miserable. Being cold and wet is a surefire way to cut your workout short and also increase the risk of hypothermia and even frostbite.

To avoid wet fabric leaving you chilled, skip any activewear made from cotton. Cotton soaks up sweat and rain and holds in moisture. Opt instead for synthetic fibers like polyester, nylon, and polypropylene that is designed to dry quickly. 

Something else we should mention is not to dress too warmly either. Exercise already generates a considerable amount of heat, which makes you feel warmer than you are. But the evaporation of sweat pulls heat away from your body, which will make you feel cold. The solution is to dress in layers that you can remove as you sweat and put back on as needed. Start with a thin layer of synthetic material to keep sweat off of your body. Then add a layer of fleece or wool for proper insulation. Top it off with a waterproof and breathable outer layer. 

Of course, you might need to experiment to find the right combination of clothing styles to match your workout intensity. A heavier person might not need as much insulation as a lean person. Keep in mind that stop-and-go interval activities like a mix of walking and running might make you more vulnerable to the cold. Especially if you’re working up a sweat and then cooling down quickly, you might not have as much fun with your outdoor workout routine.

Protect Your Skin

You probably already know that fingers, noses, toes, and ears are the most affected most by chilly temperatures. Blood is sent to the core of the body when it’s cold out, leaving less blood and heat available to hands and feet. To help avoid freezing your extremities, we suggest wearing a hat or a headband, and also gloves or mittens. You can always take them off if you’re getting warm and tuck them into your pocket or a fanny pack. Thick socks are also a good idea. As we mentioned above, any add-ons you use to protect your skin should be synthetic rather than cotton. 

It might also be a good idea to consider the design of your shoes. Running shoes are often designed to let heat escape, but during winter, the cold is coming in. You might want to invest in shoe covers to help keep the cold out. Exercise and sport equipment stores will give you some advice on what shoes are best to withstand the elements.

Another way to protect your skin is to drink lots of water. The winter air is dry as well as cold, and so drinking lots of water will help. Use moisturizing cream or lotion and maybe even use Vaseline to sensitive areas like your nostrils, tip of the nose, and ears for additional protection. Face coverings will also protect your face from the elements.

Don’t forget about the sun! Even in the winter, you are still susceptible to sunburns. Plus, snow reflects up to 80 percent of UV rays, so if you’re out while it’s snowing, you can be hit double by sun rays. This is important to consider if you’re skiing or snowboarding, where not only are you exposed to because of the snow reflection, but being higher up also increases your UV exposure.

Protect your skin by using sunscreen and wear UV-blocking sunglasses.

Don’t Skip The Warm-Up

We’ve mentioned warm-ups before, and we’ll say it again – no matter the weather, your body needs a good warm-up. However, it’s especially essential to warm-up when preparing for cold-weather workouts. A dynamic warm-up can increase blood flow and temperature in the muscles to decrease the risk of injuries.

Working out in colder temperatures increases your risk for sprains and strains. A cold rubber band snaps quickly when stretched, but a warm one is more pliable. Your muscles work similarly. The best warm-up will depend on the workout you’re doing, but at the end of the day, all warm-ups should include low-intensity movements that mimic the exercise you’re about to do. 

A warm-up is not static, stretch-and-hold movements. Those types of stretches are best at the end of your workout, during the cool-down. Ask your physical therapist what exercises will be best for your cold-weather exercise routine.

Focus On Your Breathing

The last thing we want to mention is your breathing. If you’ve ever worked out in colder weather, then you know that it feels different than exercising in warm weather. Frequently it can hurt to breathe because of how your body is reacting to cold, dry air. In colder temperatures, your airway passages tend to narrow, which means that inhalation is more difficult. Breathing in through your nose can help warm and humidify the air you’re breathing, but it’s not always feasible. 

We suggest wrapping a bandanna or scarf around your mouth or another sports mask to help trap water vapor in when you breathe out so that the air is moister and more comfortable to breathe as you continue your workout. Luckily, with COVID-19, we’re all getting used to wearing masks outside, and more companies are developing breathable masks that also filter out potentially harmful contaminants. It’s easier than ever to find masks and scarves that work great for a winter run.

Conclusion

It’s not for everyone, but exercising outside can invigorate you and give you a connection with nature you might have never had before. Without the right preparation and proper attire, cold-weather exercise can be uncomfortable and even dangerous. Start by making a plan and investing in suitable clothing. Avoid extreme or icy conditions and get back outside. 

Outdoor exercise can be an enjoyable experience, even when the temperature drops. Ask your doctor or physical therapist for more tips on adjusting your workout for colder weather to make sure you avoid injuries. Do you have a nagging injury that is currently preventing you from getting outside? Make an appointment with us! A physical therapist’s goal is to get you moving and back to doing the things you love, even in the winter. We’d love to answer your questions and see how we can alleviate your pain.

Your Go-To Tips When Training For A Marathon

Autumn is usually a time when runners start training for marathon season. Training can be an arduous process, and it requires participants to be in top shape to complete the entire race. With the pandemic still affecting our daily lives, especially in more prominent and populous areas, athletic events like the New York City Marathon are being postponed. Additionally, many people find that the more time they spend cooped up at home, the more aches and pain they experience from lack of movement. If you’re feeling discouraged as a runner, we have some tips to help you continue training for a marathon and hopefully help you get your spirits up.

Read on as we discuss some tips to help you safely get back into the running game.

Training For A Marathon? Here Are The Tips You’re Looking For

We know that a lot of you were itching to cross “running a marathon” off your bucket list for 2020, but the global pandemic has thrown a wrench in your plans. You’re not alone! COVID-19 has simply made runners a bit more creative in achieving their mileage and speed goals. Now you can participate in virtual races and other online challenges to help you fill your time as we adjust to this new normal.

Don’t give up, though! One day you will be able to participate in a real-life marathon with your fellow runners, and when that day comes, you’ll want to be ready for it. Here we’ve laid out a few timeless tips to help you start training for a marathon no matter what shape you’re in right now. 

Carefully Map Out Your Course

The first thing you should do is map out your final course and try to start incorporating your training runs on the same topography as the actual marathon. If you’re running in New York City, then you’ll want to practice running up and down hills. Chicago runners, however, need to get used to several hours of flat terrain. Though a flat course might seem like a breeze for those used to the up and down, a flat course means you’re using the same muscles the whole race with no variation, and you’ll want to prepare your body for that.

Drastic times call for drastic measures, and you might have to prepare for runs on a treadmill or even just stairways and steps, especially if you live in an area where the terrain is different from the race you’re signed up for. For example, if you live in a flat area but need to train for a hilly run, you might try to alter the incline throughout your treadmill run. 

On the actual race day, map out your course and consider leaving supplies for yourself along the way. These supplies might include water bottles, Vaseline, energy chews, and fresh masks at different points. Several sportswear companies make masks that are breathable and comfortable and can stand up to the condensation that comes from heavy breathing.

Listen To Your Body 

An important tip we like to give to runners, novice or experienced, is to listen to your body. Though aches and pains are bound to happen, especially if you’re just getting back into the running routine, pay attention to what your body is trying to tell you. Runnings who are training for a marathon tend to see a body break down usually 2-4 weeks before the race day. Overuse aches and injuries can include shin splints, Achilles and hip flexor tendonitis, and runner’s knee (known to us as patellofemoral pain).

Make sure you’re resting when you need to rest and ask your physical therapist for more exercises you can do to ease these aches and pain.

Cross-Training Is Important When Training For A Marathon

It’s also essential to implement cross-training into your training plan. Incorporate short runs with dynamic warm-ups to help keep your muscles fluid. Cross-training and building up your entire body is just as beneficial as getting in those long runs.

Don’t Forget About Mobility and Flexibility

One of the best ways to prevent those aches and injuries we mentioned above from sneaking up on you is to make the most out of your recovery days. On the days you’re not running, incorporate icing into your routine, self-massage, and don’t forget to focus on stretching and mobility. Stiff muscles won’t be able to make it the full 26 miles on race days. If you’re feeling actual pain, though, make sure you’re taking full days off too to let your body rest and heal.

Warm Up And Cool Down

Here at Park Sports, we think that the warming up and cooling down portions of your workout are essential parts of every run, and you definitely should not skip them. Proper warm-ups and cool-downs are vital in preventing injuries and helping you get the most out of your race.

When you perform a proper warm-up, you’re gradually preparing your heart, lungs, muscles, and tendons to exert each training run. It can last anywhere from five minutes to one hour. It should include gentle loosening exercises, some light jogging, static stretching, and maybe even event-specific activities like jumping over hurdles, sprinting, or running at race speed.

Once your workout is finished, you’ll want to begin your cool down, which helps your body recover and helps prepare it for tomorrow’s workout. A cool-down can include roughly 10 minutes of easy running or jogging, which encourages your heart and lungs to return to their regular rates slowly. This is also an excellent time for stretching and massage, as your muscles will be warm and loose. Stretching will help your muscles for the next day’s workout. Hold your stretch for 15 to 20 seconds, and repeat a few times per muscle group.

Try A Dress Rehearsal Run

We suggest doing a dress rehearsal run if you have the time. Four or five days before the marathon, do a three-mile run at marathon-pace in your marathon outfit and shoes. If you can, run at the same time of day as the start of your marathon so you can get your body’s rhythm in sync for race day. The more times you can do this before race day, the better.

While you’re doing short “dress rehearsal” runs, picture yourself on race day. Are you strong and relaxed? Mentally preparing for the day will help boost your confidence, and these practice runs will provide the last boost of conditioning to lock in your race pace on marathon day.

Mindset Is Everything

Though it’s important to train hard for your marathon, you should spend time working on a positive mindset as you prepare for your race. Whether it’s first thing in the morning or as you’re getting dressed for every run, start to visualize yourself crossing the finish line as the clock shows your personal best time. Start willing your positive experience into existence, and see how much better you feel on race day. 

You’ve heard the saying when the going gets tough; the tough get going. Runners already have the determination and perseverance that long races need, so we suggest adding a smile to your face and start believing in yourself. You can accomplish anything – and have fun doing it!

Reach Out To Park Sports Physical Therapy

If there’s any pain or lack of movement you’re experiencing that keeps you from participating in a marathon or even a half marathon, reach out to us. The physical therapists at Park Sports PT might be able to help you get back to doing the things you love and help relieve the pain that is holding you back.

Everyone is different when it comes to their training methods and their pain. But at Park Sports, everyone gets the same elite, top-quality, neighborhood care. To us, it’s personal, and we want to help you feel healthy, strong, and able to do the things you love. Call us today, and let’s discuss your goals.


Common Cycling Injuries

Common Cycling Injuries Can Be Avoided.

Most common cycling injuries can be avoided. Unfortunately, we do not have full control of sudden impact injuries; accidents happen. Covid-19 changed our transportation habits.  With more cyclists on the road, there are more chances of car-to-bike accidents and bike crashes. The lowest cost and the simplest way to prevent the most common injury ( head trauma) is to wear a helmet. This post is focusing on the conditions which we can control.

Hand and Wrist Pain in Cyclists.

The weight distribution on the bike should be such that 60 percent of the weight is positioned on the rear of the bike. If the seat post is too high or the handlebar is too low, then your arm and wrist take undue pressure. This results in too much weight at the front of your body. If the handlebar angle is not set correctly it may force the wrist joint into an abnormal position. This may result in ulnar nerve neuropathy. The ulnar nerve at the wrist level is vulnerable to repetitive injury. The anatomical structure at the wrist level where the ulnar nerve is passing is called the Guyon canal. It is in a unique location where the ulnar nerve is susceptible to compressive injury. Tingling in your Pinky and Ring finger is a sign of ulnar nerve compression. Wrist joint pain is another common condition in cyclists. The low position of the handlebar forces the wrist joint into more extension which in turn accelerates wear and tear of the small carpal bones that evolutionarily are not adopted for weight-bearing.

 Spine: Neck and Lower Back Pain in Cyclists

The low position of the handlebar forces the rider to hyperextend their neck to look up in order to see what is ahead. It causes compression in the cervical spine and creates muscle imbalance between the muscles in the front and the back of the neck. One possible solution to alleviate pressure on your arms is to opt for a compact or shallow handlebar. You can also adjust your handlebar position by loosening the stem bolts and rotating the stem bar upwards. This will reduce your arm’s reach.

Lower back pain in cyclists is the most common injury. A recent study has found that 58 percent of all cyclists experienced lower back pain in the previous 12 months. Because cycling is a low impact sport, it is surprising as to why the lower back pain is so common among cyclists. There are 2 possible reasons: incorrect bike geometry and muscular insufficiency. If you are planning a long time in the saddle make sure that your bike is properly fitted. There are professional services that can perform this job. Your bike is not at fault.

Muscular insufficiency can be addressed in physical therapy.  Sitting in the saddle for a long time causes the muscles behind your back, hamstrings, and calves to naturally shorten. It changes the length-tension ratio of the muscles and creates multiple issues affecting your lower back. Prolonged pedaling causes fatigue and produces undesirable muscle movement patterns in the legs and spine. It affects your back by altering the spinal posture. Lower back pain in cyclists is associated with excessive lumbar spine flexion, which in turn is associated with the reduced activity of a key stabilizer back muscle- multifidus, located in the deep layer of your back. A comprehensive lower extremity stretching program and a core stabilization program for cyclists are of paramount significance in preventing lower back dysfunction.

Knee Pain and Possible Quick Fixes.

Before you consult a medical provider for the knee pain from cycling, check your bike fit.

Pain in the front of your knee is a result of a powerful and continuous force that your quadriceps muscles exert on your knee cap. The force could be detrimental if it is applied at the wrong angle and direction. Bike fitting issues like saddle height, saddle fore, and crank length affect the pressure on your knee cap by producing an abnormal force. If the saddle is not properly adjusted in the vertical and horizontal direction the force is increased, causing more irritation. All those issues could be avoided. Understanding the basic principles of biking mechanics can save your time looking for remedies and let you enjoy the things you love to do!

But if you need us, Physical Therapists at Park Sports have a unique understanding of the mechanical aspect of cycling. We are passionate about cycling and some of our team members are advanced level multi-sport athletes that include cycling. Our office is located at Prospect Park, a major cycling venue in Brooklyn. We are here to help!

Pulmonary Rehabilitation: Post COVID-19 Recovery

Do you know that Physical Therapy can improve respiratory health? Park Sports is introducing a pulmonary rehabilitation program. Physical therapy is not often thought of as a remedy for complications following COVID-19. Pulmonary Physical Therapy can help to improve the fitness of your respiratory function. The team at Park Sports Physical Therapy is ready to step in by providing vital support to patients recovering from COVID-19.

For cases of COVID-19 that are more serious, long-term respiratory damage is a common after-effect.  Those recovering from COVID-19 may find that their lung-function is impaired to various extent. Some patients become winded from light activity, such as brisk walking. The pulmonary rehabilitation program at Park Sports aims to alleviate some of the residual effects that patients who have suffered from the Coronavirus may experience. Luckily, most cases are mild and the breathing issues are easily addressed through Physical Therapy. One significant advantage of a supervised breathing program is that it can be effectively performed in the safety of your home via Telehealth. Our skilled therapists at Park Sports employ a variety of techniques to help you bounce back from the residual effects of COVID-19 faster by teaching you how to engage your respiratory muscles. Those techniques include but are not limited to diaphragmatic breathing, visualization, biofeedback, and relaxation. 

Our mission at Park Sports Physical Therapy, located all across Brooklyn, New York, is to assist you in the rehabilitation process following severe cases of COVID-19. Whether you are suffering from long-term respiratory impairment because of a chronic lung condition, or as a result of the novel Coronavirus, our practice has you covered. Click Here to find out more about our team of highly qualified therapists. Our community-driven team of highly-educated therapists is here to aid you through your recovery process. 

Pulmonary physical therapy might include:

Pulmonary physical therapy is available not only for those recovering from COVID-19, however. It can also assist those suffering from the following conditions and symptoms:


If you find that you have any of these conditions or symptoms, and/or have contracted COVID-19, check-in with your doctor to see if pulmonary physical therapy might be the right thing for you. The data has made it conclusive that pulmonary physical therapy is very effective for treating these conditions and symptoms. Pulmonary physical therapy has been proven to improve respiratory muscle strength, endurance, lung capacity/function, and breathing capabilities.

Click here to request an appointment with us.

Click here for an exercise you can do at home for some pulmonary rehabilitation.


Tips for Runners During the Coronavirus

Social distancing during the COVID-19 epidemic has hampered the activity of most athletes. Whether it is the literal closure of gyms and certain portions of public parks, or simply the anxiety centered around going outside, staying active has become increasingly difficult. Runners are no exception to this rule. 

However, for runners, it is still possible to get in your miles. Not only this, but it is also important to continue getting in your miles. Research shows that regular exercise, assuming you are not sick, boosts immunity, and specifically, it significantly reduces the risk of contagious diseases caused by viruses and bacteria. Hence, if you’re worried about catching the coronavirus, one of your first lines of defense is regularly getting exercise. First and foremost, leading health experts suggest that so long as you keep a 6 feet distance from other people, it is perfectly safe to go out and run. In fact, not only is it safe but –aside from its immune-boosting benefits– it is recommended for the preservation of mental health. 

Aside from keeping a 6-foot distance from other people, there are a few caveats to keep in mind for when you go out on your next run. Firstly, you probably should not drink from water fountains on your water break. According to Angela Rasmussen, a virologist at Columbia University, “We don’t have any data about how long the virus remains infectious on water fountains, but, given their proximity to other people’s mouths and noses, I would say you should not.” Next, when you get back from your run, you should take your shoes off before going back into the house. According to Saskia Popescu, an infection-prevention epidemiologist, the data doesn’t definitively suggest that the coronavirus sticks to shoes, “but they carry a lot of gunk in general, so leave them at the door.” This is simply a “better safe than sorry” protocol. Another tip is to find routes that are generally unpopulated. The news has reported repeatedly runners who are violating the 6-foot-distance rule by going to populated tracks to run. Not only is this putting yourself and others at risk, but it has the potential to increase the government’s likelihood to impose more restrictions on outdoor get-togethers, including going on walks or runs, as is what happened in Italy. Generally speaking, sidewalks and ordinary streets are a good option: fewer people are out and about, making adherence to the 6-foot-distance rule easier. Likewise, going on your run in the morning or the evening will make it easier to avoid others while continuing to social distance. An exceptionally good location is here in Brooklyn: Prospect Park! Prospect Park is a quite vast and expansive park, making it easy to keep a reasonable distance from others while still getting in a great run! Finally, if you like, you can wear a mask when you go out for your run. It isn’t necessary, as, transmission of the coronavirus is extremely unlikely by merely going outdoors. Still, for the sake of alleviating some anxiety about going outside, for yourself and others, it might be a good idea to wear a mask. 

Runners, like all athletes, are susceptible to injuries. Research indicates that runners show an injury rate that ranged from 2.5 to 33 injuries per 1000 hours of training in novice runners and 17.8 injuries per 1000 hours of running in recreational runners. During this time, it can be hard to find treatment for such injuries. Many physical therapy practices have shut down due to the COVID-19 epidemic. We here at Park Sports Physical Therapy, however, are still taking on patients. An outline of Park Sports Physical Therapy’s guidelines during this time can be found here. Still, in short, we are currently offering physical therapy sessions via telehealth, which is essentially physical therapy guided coaching through video/audio online chats. The results of a study done by the Yale School of Medicine indicates little difference in effectiveness between in-person and telehealth physical therapy sessions. So if you are injured, feel free to request a telehealth PT session with us at Park Sports Physical Therapy. 

If you are injured and would like to do some exercises on your own, here are three that are particularly helpful for runners. All of these movements will require a lacrosse ball. While these cannot nearly equal having an actual physical therapy session, they can certainly bring you some relief through self-soft tissue treatment for muscle soreness:

Lacrosse Ball Shin Smash: 

This movement is particularly useful for knee, ankle, and foot soreness.

  • Source: Becoming a Supple Leopard by Dr. Kelly Starrett DTP  

Lateral and Anterior Compartment Shin Mobilization: 

If you are dealing with issues such as foot soreness, soreness associated with shin splints, strange downstream soreness, knee soreness, and/or ankle soreness, this movement can be helpful.

  • Source: Becoming a Supple Leopard by Dr. Kelly Starrett DTP  

Planter Surface Smash: 

Plantar fasciitis is a painful condition that is extremely common for runners. And also, generally speaking, foot soreness is widespread amongst runners. One way to ease foot soreness is to roll your foot on a lacrosse ball: 

  • Source: Becoming a Supple Leopard by Dr. Kelly Starrett DTP  

If you adhere to the above guidelines, you can continue your running routine while maintaining proper social distancing guidelines. Likewise, you can be sure that if any injuries arise during this time as a result of your runs, Park Sports Physical Therapy will have your back with our telehealth physical therapy sessions. Stay healthy, and keep trotting! 

Pelvic Floor Physical Therapy During Social-Distancing

This blog post is written by Samira Panjaki, PT, DPT

What is telehealth for pelvic floor physical therapy?

Pelvic floor physical therapy can be used to treat a variety of symptoms in both men and women. Conditions range from sexual pain to urinary and fecal incontinence. While an in office visit is the ideal way to be fully evaluated, making a telehealth appointment for your pelvic floor symptoms is a great way to get started. Furthermore, since telehealth is done in the comfort of your own home it eliminates any anxiety you may have about a pelvic exam.

What are pelvic floor exercises?

A recent study conducted at Vanderbilt University Medical Center (1) looked at women’s baseline knowledge of pelvic floor exercises and pelvic floor disorders. The study found that while the subjects had high baseline knowledge regarding pelvic disorders, they did not know about exercise and therefore they were not inclined to perform pelvic floor exercises. This is where your pelvic floor physical therapist can help.

What will happen during my treatment?

As part of your treatment program your pelvic floor physical therapist at Park Sports Physical Therapy will conducted a thorough subjective exam via teleconferencing. Furthermore, your PT will create an exercise program for you that can be done in the comfort of your own home. Depending on what is found on an initial evaluation your PT will create an individualized exercise program for you. This may include stretching the pelvic girdle muscles, strengthening of pelvic, abdominal, hip, and back muscles, breathing and relaxation techniques, and functional activities aimed to retrain your muscles.

Why is having access to your physical therapist so important in your plan of care?

Having an exercise program overseen by your PT will improve your chances of success. A study published in 2018 found that long long-term adherence to pelvic floor exercises in women was influenced by having personalized instructions as well as aids that served as reminders (2).

At Park Sports Physical Therapy your pelvic floor physical PT will provide you with exercises sheets and educational handouts with easy to follow instructions. Most importantly your PT will check in with you frequently to keep you accountable. If you are ready to take the next step in improving your pelvic health click here to request telehealth appointment!

Sources

1.Goodridge, SD. et al. Association of Knowledge and Presence of Pelvic Floor Disorders and Participation in Pelvic Floor Exercises: A Cross-sectional Study. Female Pelvic Med Reconstr Surg. Jan 25 2020.
2. Venegas M, Carrasco B, Casas-Cordero R. Factors influencing long-term adherence to pelvic floor exercises in women with urinary incontinence. Neurourology and Urodynamics. 2018;37:1120–1127.
3. Image credit here

Home Exercise for Scoliosis.

This blog post is written by Kristin Romeo PT, DPT, OCS, Certified Schroth Practitioner.


Kristin Romeo, PT, DPT, OCS

Home programs are an important part of the Physical Therapy regimen for those with Scoliosis. Integrating safe movements and strengthening exercises into your daily routine helps keep your body strong and stable. Below is a quick strengthening exercise that is safe for those with a spinal curvature and doesn’t require any equipment. Set aside at least ten minutes a day to keep your body strong and healthy.

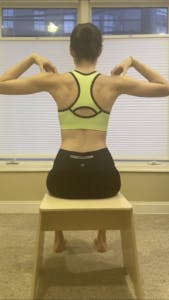
Sitting Axial Elongation and Expansion:

  • Sit in a chair with feet planted firmly on the floor. Sit with good posture and do not lean against the back of the chair. Put hands on your shoulders with elbows pointing outwards, forearms parallel to the floor.
  • Try to maintain a small arch in your low back and take a big inhalation through your nose. As you breathe in, try to reach your spine tall by reaching the crown of your head upwards to the ceiling.  Gain as much height as you can and expand your ribs wide. Be mindful not to shrug up your shoulders as you breathe.
  • Slowly release the air through pursed lips while making a “ssss” sound to slow down the exhalation. Try to maintain the height you gained during the inhalation and keep muscles activated during your exhalation.
  • Repeat for three sets of ten breaths.


Keeping up with the exercises prescribed to you by your Schroth Physical Therapist is important to keep your spine healthy as you age. It’s critical to keep a good exercise routine while you’re home because of the COVID-19 pandemic (and always!) as you don’t want to lose the progress you’ve worked so hard to make. Stay strong and stay healthy!

Learn more https://www.schrothmethod.com/


Hands-On learning with Maitland Australian Physiotherapy at Park Sports PT

We at Park Sports Physical Therapy had the privilege of hosting and participating in a wonderful manual therapy course titled The Essential Spinal Seminar. Below I am excited to share some information about the “Maitland Australian Physiotherapy Seminars” or MAPS, what “manual therapy” means in the context of physical therapy, and our experience overall. 

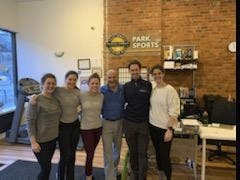
Genya, Melissa, Kristen and Abbe with our wonderful instructors!

A Little Bit About Manual Therapy, Maitland Australian Physiotherapy Seminars (MAPS), and The Maitland Australian Approach

In the PT profession, manual therapy can refer to several types of hands-on or tool assisted treatments used to alleviate pain, stiffness, swelling, and many other impairments. These interventions can range from light-handed techniques such as those often used during manual lymphatic drainage techniques, to deep pressure methods used for trigger point release, to high velocity/low amplitude thrust maneuvers used to safely elicit a “cavitation” (most commonly referred to as “cracking”), and more.  

Maitland-Australian Physiotherapy Seminars (MAPS) is a leading organization dedicated to promoting research-based continuing education in the field of manual and orthopedic physical therapy, with a focus on improving the consistency, efficacy and empathy with which these manual approaches are used in clinical practice.

The course we hosted, titled the “Essential Spinal Seminar”, focuses on the assessment and treatment of our clients’ symptoms originating from the neck, upper back or thoracic spine, and lower back or lumbosacral spines.  The MAPS’s “Maitland Australian Approach” is founded on the “Bio-Psycho-Social model”, which emphasizes the importance of focusing on the biological, psychological and social aspects of our clients’ chief complaints together in order to address their needs as a person, and not just the body part listed on their prescription.

Our Experience with the Essential Spinal Seminar

Prior to our first day, we spent a large number of hours over several weeks reviewing the history of MAPS and the Maitland Australian Approach, delving into many pertinent research articles discussing up-to-date nuances of modern, evidence-based manual physical therapy, and buffing up our spinal assessment and manual therapy intervention skills.

Day 1: The Low Back

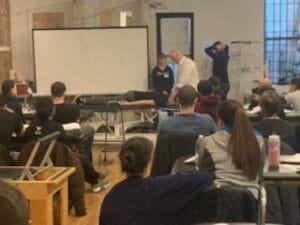
We began day 1 by introducing ourselves to our fellow classmates, who included physical therapists from all over the trig-state area and clinical settings ranging from hospitals, to pediatric clinics, to other outpatient private practices. After quickly reviewing our pre-course materials and some great one-liners from our instructor, we dove straight into a hands-on assessment and intervention of the low-back (lumbar and sacral spines). We reviewed how to assess for different directional preferences, how to differentiate between symptoms stemming from nerve versus joint versus muscular concerns, and how to systematically address our findings using joint mobilization techniques.

Perhaps most importantly, we reviewed time and time again the importance of listening to our clients, addressing the impairments our clients described instead of the impairments we might expect, consistent re-assessment to ensure that our chosen intervention is having the desired effect, with a chance to change things up if things do not go as initially planned. We ended day 1 excited about the knowledge we had gained and the colleagues we had met, extremely grateful for the two patients who had so graciously given their time to serve as models, and a little hungry considering we had finished all of our free bagels by lunch time.

Day 2: The Neck and Upper Back

Day 2 consisted of similar hands-on lessons, this time focusing on the evaluation and treatment symptoms stemming from the neck (cervical spine) and mid-back (thoracic spine). Our patient model today was Genya, one of the amazing physical therapists at Park Sports’ Fulton Street location, who shared with us her story of her immovable rib. Again, we gained valuable knowledge, and Genya gained some more pain-free range with twisting and rotating her body, and Patrick bought us more bagels.

Overall, as a group we ended the seminar with a renewed sense of focus on the assessment and application of applying our manual therapy techniques, and an appreciation for the way in which the Maitland Australian Approach emphasizes individualizing treatment to the client’s specific needs (biological, psychological and social). We felt empowered by our new knowledge, and have already begun implementing these powerful skills within our offices with clinically significant results. Feel free to ask us about our experience and any questions you may have. 


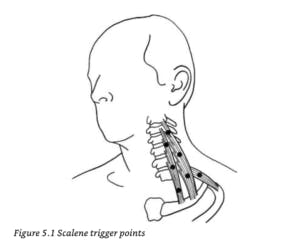
Addressing Neck, Shoulder and Back Pain with a Scalenes Trigger Point Release at Home

In the context of physical therapy, massage therapy, orthopedics and other clinical settings, you may have heard the term Trigger Point being used to explain the cause of some of your symptoms. Today, we are going to focus on what these trigger points are, how they might contribute to some of the symptoms you may be feeling, and describe in detail a Scalenes trigger point release technique. Why do we care specifically about the Scalenes Muscles? Your scalenes, as we will describe below, are frequent culprits when it comes to neck, shoulder, scapula and arm pain. In addition, they are often affected by anxiety, stress and poor posture, all of which we are dealing with more than ever during these challenging times!

For additional information regarding trigger points, we highly recommend Clair and Amber Davies’s The Trigger Point Therapy Workbook: Your Self-Treatment Guide for Pain Relief.  In addition to more information on the scalenes trigger point release, there you will find excellent descriptions of common trigger points, referred pain patterns, and self-treatment guides.  Unless otherwise specified, most descriptions and images below come from this very helpful resource.

What are “Trigger Points”?

Clinically speaking, the term Trigger Point refers to any painful point that develops within muscle tissue. They can be present within any muscle, and tend to develop after long-term or inappropriate stress is placed on that muscle (see below for examples of stressors). Trigger points can be thought of as “active” or “latent”. Fernández de Las Peñas et al (2017) conducted an international consensus review to establish clinically relevant definitions for “active” versus “latent” points, and came up with the following distinctions:

  • Active Trigger Point: causes a clinical pain complaint
    • Always tender,  and may prevent full muscle lengthening (make your muscles feel tight)
    • Cause muscle weakness
    • When compressed, refers a patient-recognized pain, and/or motor phenomenon (i.e. twitching)
    • When stimulated may cause a local twitch response of muscle fibers compressed within the patient’s pain tolerance
  • Latent Trigger Point: clinically inactive with respect to spontaneous pain
    • Painful only when palpated (meaning “touched” or “pressed on”)
    • May have all the other clinical characteristics of active TPs
    • Always has a taut band that increases muscle tension and restricts range of motion

What are your Scalenes?

The Scalenes are a muscle group that help stabilize, flex (bend forward), laterally flex (tilt the head to the side), and rotate the neck. They also help raise your upper two ribs when you inhale, meaning they are working every time you breathe. However, they work HARDEST during labored breathing, i.e. during vigorous activity, coughing, sneezing, or during periods of anxiety (hence, why they may be more bothersome to some people at this time!)

Where are your Scalenes?

  • Anterior Scalene: the front-most scalene muscle, lies between the SCM (sternocleidomastoid) and the neck vertebrae and is almost completely hidden
  • Middle Scalene: is behind the anterior scalene, more on the side of the neck, with its lower half free of the SCM
  • Posterior Scalene: almost horizontal, behind the middle scalene in a triangular groove just above the collarbone (clavicle) and below the front edge of the upper trapezius (the bulkier muscles that help you shrug your shoulders)

What do Trigger Points in the Scalenes Feel Like?

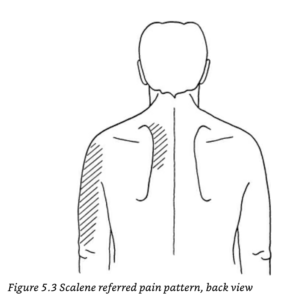
As described above, trigger points themselves can create a number of different sensations. If you have trigger points throughout your Scalenes that are more active, you may feel some pain or symptoms throughout your shoulder blade/scapula, shoulder joint, side of your arm, forearm and fingers, up to your neck, into your chest, or in a combination of some or all of these locations.

Trigger points in your Scalenes, when pressed on, can produce particularly “strange” sensation, sometimes described as “nervey”, “weird”, “burning” 

What causes the development of trigger points within the Scalenes?

1. Not-So-Great Breathing

Improper breathing patterns such as chest breathing (breathing so that your chest rises with every breath) or nervous hyperventilation will overtax the scalene muscles. Who is prone to these types of breathing patterns?

  • Those experiencing emotional tension, anxiousness or stress (for example, anyone who might currently find themselves in either social isolation OR working in close proximity with ill individuals…).
  • Individuals with chronic respiratory conditions such as asthma or emphysema that make breathing more labored.
  • Individuals with new or worsening respiratory conditions such as pneumonia, bronchitis, allergies, or a common cold that result in constant coughing.

2. Improper Body Positioning

  • Working for long hours with the arms out in front of the body can be very stressful for your Scalenes, including working at your computer. Pulling, lifting, and carrying heavy loads can also cause stress, including rearranging heavy furniture or an intense day of spring cleaning.
  • Carrying a heavy grocery bags or backpacks.
  • Maintaining improper posture – your Scalenes are largely responsible for managing the weight of the head, which is quite heavy! Any posture you assume where your head is not supported, or that puts your head in front of or behind your upright torso creates an imbalance and puts an additional burden on them.

So, what can you do at home to address symptoms that might be caused by Scalenes Trigger Points?

First, try to adjust some of the habits that might be creating them in the first place:

  • Focus on proper diaphragmatic breathing. Diaphragmatic breathing refers to breathing so that your belly rises with every breath instead of your chest or shoulders. This type of breathing is often used during meditation and relaxation sessions and can help with mental as well as physical stress. This video from Mass General Hospital helps demonstrate good diaphragmatic breathing technique.
  • Focus on maintaining good, neutral posture in sitting, standing and sleeping positions. To do this while sitting and standing, you can think about “reaching” your head straight up towards the ceiling, almost as if it is being pulled up by an invisible thread – feel yourself “creating space” in between each vertebrae as you elongate your spine. While lying down, focus on giving your head and legs proper support so that your spine, head and hips remain as aligned as possible. For some quick tips, you can watch this video, or feel free to reach out to a Physical Therapist for a more targeted consultation!


Next, try a Scalenes Trigger Point Release technique!

STOP – CONTRAINDICATIONS: Before moving onto the technique, it is important for us to make you aware of some of the reasons you should not continue. We always recommend consulting with a healthcare professional before attempting any self-release technique if there is a possibility of fracture, nerve damage, cardiovascular disease or blood vessel compromise in the area you plan to massage. If you have been through a recent physical trauma or accident, or have experienced any of the following symptoms, do not attempt this technique, and seek medical attention:

  • Dizziness and/or unsteadiness
  • Diplopia (double vision or visual field loss)
  • Dysarthria/dysphasia (difficulty speaking or finding the right words)
  • Dysphagia (difficulty swallowing or sudden hoarseness of voice)
  • Drop attacks (sudden collapse without loss of consciousness)
  • Nystagmus (uncontrolled sideways movement of the eyes)
  • Nausea or vomiting
  • Numbness or paraesthesia (altered light touch sensation), particularly around the mouth


Scalenes Self-Trigger Point Release Technique 

In order to fully address any pain or symptoms that might be coming from scalenes trigger points, it is important to move as methodically as possible through all 3 major branches of the scalenes: Anterior, Middle & Posterior. Below we have described how to find each branch and perform your self-release technique. 

General Guidelines:

  • Clip or file your fingernails prior to starting this technique – long nails are not your friend when digging into the side of your neck!
  • Use short strokes in either a straight line, no more than half an inch long, or in small circular strokes, both performed with 1-2 fingers. For hard to reach places, feel free to use a lacrosse ball or tennis ball (this applies more to techniques being used for muscles of the back, hips and legs that are bulkier and/or harder to reach with your hands).
  • Make sure you focus on performing strokes at multiple points throughout each muscle, instead of focusing on just one point over and over. 
  • Focus on performing 10-12 strokes per tender spot, 3-6 times per day
  • When pressing on a trigger point, you should feel no more than a 4 or 5 on a scale of 1-10 pain, 1 being very minimal pain, 10 being “emergency room level pain” or “the worst pain you have ever felt”
  • If you can feel your pulse under your fingers, do not press down! You have found your carotid or subclavian pulses, which are great for helping you know you are alive, but not great for finding places to press down hard.
  • Don’t be too concerned about getting the massage exactly right. As long as you are aware of and adhere to the contraindications listed above, pay attention to your symptoms and pain level, avoid pressing on pulse points, and check-in with how you are feeling before and after your self-treatment, it is highly unlikely that you will cause yourself any harm! That being said, if you feel at all uncomfortable with performing this technique, or have additional questions you’d like answered before trying it out, feel free to reach out to a Physical Therapist for help!

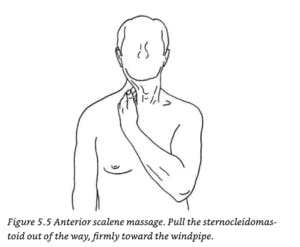
Anterior Scalene

  1. Get your fingers between the neck vertebrae and the sternocleidomastoid (SCM) – the SCM will feel like a “rope of muscle” that runs from your ear down to your sternum.
  2. Grip the SCM between the fingers and thumb, of the opposite hand, as if you were going to massage it. 
  3. Let go with your thumb and with your fingers pull the entire SCM about two inches toward the windpipe. 
  4. With your fingers, press directly back – this should pin the anterior scalene against your vertebral column in order to create nice pressure underneath your fingertips.

Middle Scalene

  1. Repeat steps 1-3 above.
  2. Starting just below your ear, press into the side of your neck. You may feel some “bony knobs” under your fingertips – these are the transverse processes (or sides) of your vertebrae. You want to make sure that you are in front of these knobs. Otherwise, you are likely massaging muscles in the back of your neck (which, to be fair, is not bad at all, but just not what you are looking to do right now).
  3. You can confirm that you are in the right position by quickly taking a few short, repeated breaths – you should feel the muscle twitching below your fingers. 
  4. On the side of the neck here, use the same stroke you used for the anterior scalene. 
  5. Follow this muscle all the way from just below the ear down to the middle of the collarbone.

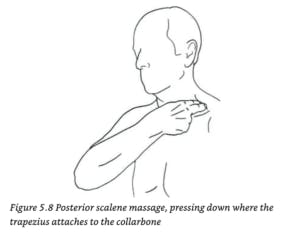
Posterior Scalene

  1. Push your middle finger under the front edge of the trapezius muscle near where it attaches to the collarbone. 
  2. Press downward and drag your finger an inch or so toward your neck in a short, straight line parallel to your collarbone. In this case, the bone you might feel under your fingers is your first rib.


Feel free to try this Scalenes trigger point release out at any point throughout your day. If you have any questions or comments, certainly feel free to reach out! We are open for new visits and telehealth sessions to address your needs throughout this time.  Thanks for reading!

References:

Davies, Clair. The Trigger Point Therapy Workbook: Your Self-Treatment Guide for Pain Relief (A New Harbinger Self-Help Workbook) (p. 101). New Harbinger Publications. Kindle Edition. 

Fernaindez De Las Penas, C., & Dommerholt, J. (2017). International Consensus on Diagnostic Criteria and Clinical Considerations of Myofascial Trigger Points: A Delphi Study. Pain Medicine, 19(1), 142-150. doi:10.1093/pm/pnx207

Also, feel free to read up on more helpful techniques at home, such as Telehealth for Brooklyn-based Physical Therapy and Increasing Shoulder Range of Motion.