Back Pain From Cycling – Causes and Prevention Tips

Are you feeling back pain from cycling? Given how hard your legs work when you’re on your bike, it’s natural to assume that your knees would be most vulnerable to a cycling injury. However, research suggests that the biggest culprit is not knee pain but lower back pain!

Let’s discuss why cyclists are suffering from back pain and how you might prevent it.

How to Prevent Back Pain From Cycling

You might be surprised at the number of people who are afflicted with back pain from cycling, given that it is a low-impact sport and is often recommended for those who suffer from back pain. Why is lower back pain so common among cyclists? It might be your bike setup.


Start With Correct Bike Set-Up

Though lower back pain often occurs because of muscle weakness or improper movement as a result of fatigue, one thing we recommend is to assess your bike fit, too, as this can also be a contributing factor. You want to choose a bike frame with the proper geometry to ensure the correct riding position, which can help minimize the pain on not only your lower back but your knees, shoulders, and even your neck.

When you’ve found a frame that suits you, the next step is to set up on it correctly. There are a few key elements to look at. First, the saddle height should be positioned so that when the pedal is at the bottom of the stroke, and the ball of your foot is on the pedal, your knees are slightly bent. Hips shouldn’t move sideways during crank rotation, and you shouldn’t have to stretch at the bottom of the pedal stroke.

Saddle angle is also critical. It should be in a horizontal position, parallel with the floor (sometimes a very slight downwards tilt can be helpful for those who experience pressure in the perineum area). 

Handlebars should be adjusted as well. You should adjust them so that you don’t have to stretch to reach them, but they shouldn’t be too close to your body either. You want your arm position to be comfortable when you reach for them in an upright position, and your elbows should be slightly bent.

Work Your Core

A significant factor that plays into back pain is muscle fatigue and the resulting poor posture to accommodate. Some studies suggest that when cyclists are pedaling to exhaustion, their hamstrings and calf muscles became tired, resulting in undesirable changes in muscle movement patterns. The degree to which you bend forward in the lumbar region and how far your knees are splayed out affects your back. Basically, the more tired you become in your legs, the worse your spinal posture gets.

The evidence points to the fact that to avoid muscle fatigue and strengthen your lower back to prevent pain due to impaired movement patterns, you must work on your core. Your core is your foundation, so if your core is weak, then your lower back muscles will likely try to compensate, leading to overworking, stress on the joints and ligaments within your spine, stiffness, and pain.

A certified therapist like those at Park Sports Physical Therapy in Brooklyn can give you some outpatient therapy and equip you with a plan of safe exercises to practice based on your functional strength and pain symptoms.

Stretch Before and After Riding

Several things can lead to lower back pain. Tight hamstrings are common for cyclists as they pull the pelvis down and cause the lower back to curve more than it should. Tight hip flexors, quadriceps, piriformis, and other muscles can lead to back pain as well. The more flexible you are, the more efficient your cycling will be, and the less likely you’ll experience pain from improper positioning. 

There are lots of stretches you should do before and after you ride. Reach out to our team for a complete list of great stretches for cycling. Yoga and pilates, in general, will help you stay limber.

Contact Park Sports PT If You’re Suffering With Back Pain From Cycling

Lower back pain in cyclists is a very common injury. Some studies suggest that more than half of all cyclists have experienced lower back pain in this year alone. The two main reasons why back pain from cycling happens are incorrect bike geometry or muscular insufficiency, and sometimes both! If you’re a cyclist or are planning to spend more time on your bike this summer, make sure that your bike is properly fitted. Bike shops can be a huge help here.

Muscular insufficiency can be addressed in physical therapy. We know that sitting in the saddle for a long time causes the muscles in your calves, hamstrings, and behind your back to naturally shorten. This position changes the length-tension ratio of the muscles and creates multiple issues that could lead to pain. Additionally, prolonged pedaling causes fatigue, which leads to undesirable muscle movement patterns in the legs and spine. It affects your bike by altering the spinal posture. Physical therapists usually associate excessive lumbar spine flexion with lower back pain in cyclists. Excessive lumbar spine flexion is associated with the reduced activity of a key back muscle, multifidus, a stabilizing muscle located in the deep layer of your back.

At Park Sports, we’ll build you a comprehensive lower extremity stretching program and a core stabilization program for cyclists suffering from back pain. We think that back pain from cycling can be avoided, it just comes down to understanding the basic principles of biking mechanics and building up your core so that you can get back to the things you love, pain-free!

When you need us, the physical therapists at Park Sports know all the ins and outs of the mechanical aspect of cycling. We are passionate about sports and athletics, and some of our team members are advanced-level multi-sport athletes that include cycling. Our office is located at Prospect Park, a major cycling venue in Brooklyn. Give us a call to schedule a consultation or a meeting; we would love to help!

Common Cycling Injuries

Common Cycling Injuries Can Be Avoided.

Most common cycling injuries can be avoided. Unfortunately, we do not have full control of sudden impact injuries; accidents happen. Covid-19 changed our transportation habits.  With more cyclists on the road, there are more chances of car-to-bike accidents and bike crashes. The lowest cost and the simplest way to prevent the most common injury ( head trauma) is to wear a helmet. This post is focusing on the conditions which we can control.

Hand and Wrist Pain in Cyclists.

The weight distribution on the bike should be such that 60 percent of the weight is positioned on the rear of the bike. If the seat post is too high or the handlebar is too low, then your arm and wrist take undue pressure. This results in too much weight at the front of your body. If the handlebar angle is not set correctly it may force the wrist joint into an abnormal position. This may result in ulnar nerve neuropathy. The ulnar nerve at the wrist level is vulnerable to repetitive injury. The anatomical structure at the wrist level where the ulnar nerve is passing is called the Guyon canal. It is in a unique location where the ulnar nerve is susceptible to compressive injury. Tingling in your Pinky and Ring finger is a sign of ulnar nerve compression. Wrist joint pain is another common condition in cyclists. The low position of the handlebar forces the wrist joint into more extension which in turn accelerates wear and tear of the small carpal bones that evolutionarily are not adopted for weight-bearing.

 Spine: Neck and Lower Back Pain in Cyclists

The low position of the handlebar forces the rider to hyperextend their neck to look up in order to see what is ahead. It causes compression in the cervical spine and creates muscle imbalance between the muscles in the front and the back of the neck. One possible solution to alleviate pressure on your arms is to opt for a compact or shallow handlebar. You can also adjust your handlebar position by loosening the stem bolts and rotating the stem bar upwards. This will reduce your arm’s reach.

Lower back pain in cyclists is the most common injury. A recent study has found that 58 percent of all cyclists experienced lower back pain in the previous 12 months. Because cycling is a low impact sport, it is surprising as to why the lower back pain is so common among cyclists. There are 2 possible reasons: incorrect bike geometry and muscular insufficiency. If you are planning a long time in the saddle make sure that your bike is properly fitted. There are professional services that can perform this job. Your bike is not at fault.

Muscular insufficiency can be addressed in physical therapy.  Sitting in the saddle for a long time causes the muscles behind your back, hamstrings, and calves to naturally shorten. It changes the length-tension ratio of the muscles and creates multiple issues affecting your lower back. Prolonged pedaling causes fatigue and produces undesirable muscle movement patterns in the legs and spine. It affects your back by altering the spinal posture. Lower back pain in cyclists is associated with excessive lumbar spine flexion, which in turn is associated with the reduced activity of a key stabilizer back muscle- multifidus, located in the deep layer of your back. A comprehensive lower extremity stretching program and a core stabilization program for cyclists are of paramount significance in preventing lower back dysfunction.

Knee Pain and Possible Quick Fixes.

Before you consult a medical provider for the knee pain from cycling, check your bike fit.

Pain in the front of your knee is a result of a powerful and continuous force that your quadriceps muscles exert on your knee cap. The force could be detrimental if it is applied at the wrong angle and direction. Bike fitting issues like saddle height, saddle fore, and crank length affect the pressure on your knee cap by producing an abnormal force. If the saddle is not properly adjusted in the vertical and horizontal direction the force is increased, causing more irritation. All those issues could be avoided. Understanding the basic principles of biking mechanics can save your time looking for remedies and let you enjoy the things you love to do!

But if you need us, Physical Therapists at Park Sports have a unique understanding of the mechanical aspect of cycling. We are passionate about cycling and some of our team members are advanced level multi-sport athletes that include cycling. Our office is located at Prospect Park, a major cycling venue in Brooklyn. We are here to help!

Addressing Neck, Shoulder and Back Pain with a Scalenes Trigger Point Release at Home

In the context of physical therapy, massage therapy, orthopedics and other clinical settings, you may have heard the term Trigger Point being used to explain the cause of some of your symptoms. Today, we are going to focus on what these trigger points are, how they might contribute to some of the symptoms you may be feeling, and describe in detail a Scalenes trigger point release technique. Why do we care specifically about the Scalenes Muscles? Your scalenes, as we will describe below, are frequent culprits when it comes to neck, shoulder, scapula and arm pain. In addition, they are often affected by anxiety, stress and poor posture, all of which we are dealing with more than ever during these challenging times!

For additional information regarding trigger points, we highly recommend Clair and Amber Davies’s The Trigger Point Therapy Workbook: Your Self-Treatment Guide for Pain Relief.  In addition to more information on the scalenes trigger point release, there you will find excellent descriptions of common trigger points, referred pain patterns, and self-treatment guides.  Unless otherwise specified, most descriptions and images below come from this very helpful resource.

What are “Trigger Points”?

Clinically speaking, the term Trigger Point refers to any painful point that develops within muscle tissue. They can be present within any muscle, and tend to develop after long-term or inappropriate stress is placed on that muscle (see below for examples of stressors). Trigger points can be thought of as “active” or “latent”. Fernández de Las Peñas et al (2017) conducted an international consensus review to establish clinically relevant definitions for “active” versus “latent” points, and came up with the following distinctions:

  • Active Trigger Point: causes a clinical pain complaint
    • Always tender,  and may prevent full muscle lengthening (make your muscles feel tight)
    • Cause muscle weakness
    • When compressed, refers a patient-recognized pain, and/or motor phenomenon (i.e. twitching)
    • When stimulated may cause a local twitch response of muscle fibers compressed within the patient’s pain tolerance
  • Latent Trigger Point: clinically inactive with respect to spontaneous pain
    • Painful only when palpated (meaning “touched” or “pressed on”)
    • May have all the other clinical characteristics of active TPs
    • Always has a taut band that increases muscle tension and restricts range of motion

What are your Scalenes?

The Scalenes are a muscle group that help stabilize, flex (bend forward), laterally flex (tilt the head to the side), and rotate the neck. They also help raise your upper two ribs when you inhale, meaning they are working every time you breathe. However, they work HARDEST during labored breathing, i.e. during vigorous activity, coughing, sneezing, or during periods of anxiety (hence, why they may be more bothersome to some people at this time!)

Where are your Scalenes?

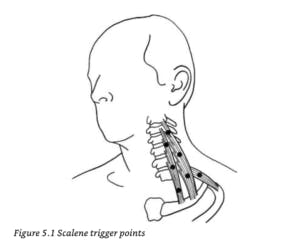
  • Anterior Scalene: the front-most scalene muscle, lies between the SCM (sternocleidomastoid) and the neck vertebrae and is almost completely hidden
  • Middle Scalene: is behind the anterior scalene, more on the side of the neck, with its lower half free of the SCM
  • Posterior Scalene: almost horizontal, behind the middle scalene in a triangular groove just above the collarbone (clavicle) and below the front edge of the upper trapezius (the bulkier muscles that help you shrug your shoulders)

What do Trigger Points in the Scalenes Feel Like?

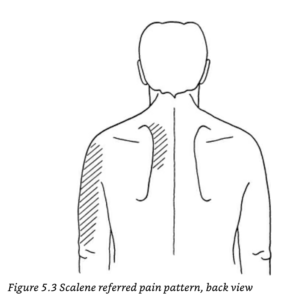
As described above, trigger points themselves can create a number of different sensations. If you have trigger points throughout your Scalenes that are more active, you may feel some pain or symptoms throughout your shoulder blade/scapula, shoulder joint, side of your arm, forearm and fingers, up to your neck, into your chest, or in a combination of some or all of these locations.

Trigger points in your Scalenes, when pressed on, can produce particularly “strange” sensation, sometimes described as “nervey”, “weird”, “burning” 

What causes the development of trigger points within the Scalenes?

1. Not-So-Great Breathing

Improper breathing patterns such as chest breathing (breathing so that your chest rises with every breath) or nervous hyperventilation will overtax the scalene muscles. Who is prone to these types of breathing patterns?

  • Those experiencing emotional tension, anxiousness or stress (for example, anyone who might currently find themselves in either social isolation OR working in close proximity with ill individuals…).
  • Individuals with chronic respiratory conditions such as asthma or emphysema that make breathing more labored.
  • Individuals with new or worsening respiratory conditions such as pneumonia, bronchitis, allergies, or a common cold that result in constant coughing.

2. Improper Body Positioning

  • Working for long hours with the arms out in front of the body can be very stressful for your Scalenes, including working at your computer. Pulling, lifting, and carrying heavy loads can also cause stress, including rearranging heavy furniture or an intense day of spring cleaning.
  • Carrying a heavy grocery bags or backpacks.
  • Maintaining improper posture – your Scalenes are largely responsible for managing the weight of the head, which is quite heavy! Any posture you assume where your head is not supported, or that puts your head in front of or behind your upright torso creates an imbalance and puts an additional burden on them.

So, what can you do at home to address symptoms that might be caused by Scalenes Trigger Points?

First, try to adjust some of the habits that might be creating them in the first place:

  • Focus on proper diaphragmatic breathing. Diaphragmatic breathing refers to breathing so that your belly rises with every breath instead of your chest or shoulders. This type of breathing is often used during meditation and relaxation sessions and can help with mental as well as physical stress. This video from Mass General Hospital helps demonstrate good diaphragmatic breathing technique.
  • Focus on maintaining good, neutral posture in sitting, standing and sleeping positions. To do this while sitting and standing, you can think about “reaching” your head straight up towards the ceiling, almost as if it is being pulled up by an invisible thread – feel yourself “creating space” in between each vertebrae as you elongate your spine. While lying down, focus on giving your head and legs proper support so that your spine, head and hips remain as aligned as possible. For some quick tips, you can watch this video, or feel free to reach out to a Physical Therapist for a more targeted consultation!


Next, try a Scalenes Trigger Point Release technique!

STOP – CONTRAINDICATIONS: Before moving onto the technique, it is important for us to make you aware of some of the reasons you should not continue. We always recommend consulting with a healthcare professional before attempting any self-release technique if there is a possibility of fracture, nerve damage, cardiovascular disease or blood vessel compromise in the area you plan to massage. If you have been through a recent physical trauma or accident, or have experienced any of the following symptoms, do not attempt this technique, and seek medical attention:

  • Dizziness and/or unsteadiness
  • Diplopia (double vision or visual field loss)
  • Dysarthria/dysphasia (difficulty speaking or finding the right words)
  • Dysphagia (difficulty swallowing or sudden hoarseness of voice)
  • Drop attacks (sudden collapse without loss of consciousness)
  • Nystagmus (uncontrolled sideways movement of the eyes)
  • Nausea or vomiting
  • Numbness or paraesthesia (altered light touch sensation), particularly around the mouth


Scalenes Self-Trigger Point Release Technique 

In order to fully address any pain or symptoms that might be coming from scalenes trigger points, it is important to move as methodically as possible through all 3 major branches of the scalenes: Anterior, Middle & Posterior. Below we have described how to find each branch and perform your self-release technique. 

General Guidelines:

  • Clip or file your fingernails prior to starting this technique – long nails are not your friend when digging into the side of your neck!
  • Use short strokes in either a straight line, no more than half an inch long, or in small circular strokes, both performed with 1-2 fingers. For hard to reach places, feel free to use a lacrosse ball or tennis ball (this applies more to techniques being used for muscles of the back, hips and legs that are bulkier and/or harder to reach with your hands).
  • Make sure you focus on performing strokes at multiple points throughout each muscle, instead of focusing on just one point over and over. 
  • Focus on performing 10-12 strokes per tender spot, 3-6 times per day
  • When pressing on a trigger point, you should feel no more than a 4 or 5 on a scale of 1-10 pain, 1 being very minimal pain, 10 being “emergency room level pain” or “the worst pain you have ever felt”
  • If you can feel your pulse under your fingers, do not press down! You have found your carotid or subclavian pulses, which are great for helping you know you are alive, but not great for finding places to press down hard.
  • Don’t be too concerned about getting the massage exactly right. As long as you are aware of and adhere to the contraindications listed above, pay attention to your symptoms and pain level, avoid pressing on pulse points, and check-in with how you are feeling before and after your self-treatment, it is highly unlikely that you will cause yourself any harm! That being said, if you feel at all uncomfortable with performing this technique, or have additional questions you’d like answered before trying it out, feel free to reach out to a Physical Therapist for help!

Anterior Scalene

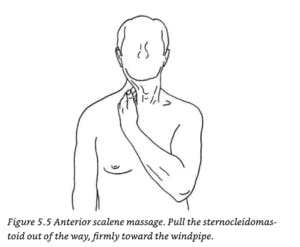
  1. Get your fingers between the neck vertebrae and the sternocleidomastoid (SCM) – the SCM will feel like a “rope of muscle” that runs from your ear down to your sternum.
  2. Grip the SCM between the fingers and thumb, of the opposite hand, as if you were going to massage it. 
  3. Let go with your thumb and with your fingers pull the entire SCM about two inches toward the windpipe. 
  4. With your fingers, press directly back – this should pin the anterior scalene against your vertebral column in order to create nice pressure underneath your fingertips.

Middle Scalene

  1. Repeat steps 1-3 above.
  2. Starting just below your ear, press into the side of your neck. You may feel some “bony knobs” under your fingertips – these are the transverse processes (or sides) of your vertebrae. You want to make sure that you are in front of these knobs. Otherwise, you are likely massaging muscles in the back of your neck (which, to be fair, is not bad at all, but just not what you are looking to do right now).
  3. You can confirm that you are in the right position by quickly taking a few short, repeated breaths – you should feel the muscle twitching below your fingers. 
  4. On the side of the neck here, use the same stroke you used for the anterior scalene. 
  5. Follow this muscle all the way from just below the ear down to the middle of the collarbone.

Posterior Scalene

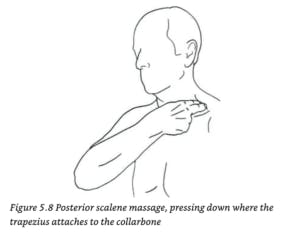
  1. Push your middle finger under the front edge of the trapezius muscle near where it attaches to the collarbone. 
  2. Press downward and drag your finger an inch or so toward your neck in a short, straight line parallel to your collarbone. In this case, the bone you might feel under your fingers is your first rib.


Feel free to try this Scalenes trigger point release out at any point throughout your day. If you have any questions or comments, certainly feel free to reach out! We are open for new visits and telehealth sessions to address your needs throughout this time.  Thanks for reading!

References:

Davies, Clair. The Trigger Point Therapy Workbook: Your Self-Treatment Guide for Pain Relief (A New Harbinger Self-Help Workbook) (p. 101). New Harbinger Publications. Kindle Edition. 

Fernaindez De Las Penas, C., & Dommerholt, J. (2017). International Consensus on Diagnostic Criteria and Clinical Considerations of Myofascial Trigger Points: A Delphi Study. Pain Medicine, 19(1), 142-150. doi:10.1093/pm/pnx207

Also, feel free to read up on more helpful techniques at home, such as Telehealth for Brooklyn-based Physical Therapy and Increasing Shoulder Range of Motion.

Schroth Method for Scoliosis Specialist

Park Sports PT’s newest Schroth Method Specialist Irina Taranenko

At Park Sports PT, we pride ourselves on recruiting the finest physical therapists. Our team is diverse, certified and compassionate about their patients and their careers. So, we’re excited to introduce Irina Taranenko. Irina’s focus is Scoliosis and she is a certified Schroth Method therapist.

Irina is a long time resident of Brooklyn and is passionate about her city, her community and her career. Sports played a big part of Irina’s childhood. She competed on a high level in numerous individual and team sports. As a result, these experiences gave her a unique awareness of her body and her health.

It was this combination of science and movement that really appealed to Irina as she began thinking about her career. Irina decided to pursue Physical Therapy and received her DPT and Bachelors of Science degree in from Touro College in New York City with a focus on research based patient care.

irina taranenko

Struggling with Scoliosis.

Growing up, Irina struggled with scoliosis. Hence, she experienced two major surgeries and the arduous recovery from each surgery. Scoliosis quickly became a subject Irina could closely relate. Her personal experiences helped her understand the emotional challenges scoliosis presents to patients. Because of this Irina decided to obtain her C1 certification through the Barcelona Scoliosis Physical Therapy School (BSPTS) where she became a certified Schroth Therapist.

The Schroth method has recently gained more popularity in the US. As a result, method has built a strong reputation in the industry. It is known as a great way to successfully correct posture and halt curvature of the spine. The Schroth method was not readily available to Irina when she was dealing with her childhood scoliosis. Consequently, helping others with the Schroth Method became very appealing to her.

Park Sports PT Schroth Method

CLICK HERE for a detailed look into the history of the Schroth Method.

Irina specializes in the three-dimensional treatment of Scoliosis. The three dimensional approach to scoliosis deals with postural corrections to elongate the trunk and correct imbalances of the spine. The goal is to develop the inner muscles of the rib cage in order to change the shape of the upper trunk and to correct any spinal abnormalities.

Scoliosis affects 6-9 million Americans. The primary age of onset for scoliosis is 10-15 years old, occurring equally male and female. At Park Sports PT, we treat scoliosis using the Scroth Method. This specialized form of treatment has shown to greatly ease pain and improve current and potential quality of health for younger and older patients. Irina is part of our dedicated team of Park Sports Schroth specialists.


Contact us today to learn more.

Low Back Pain and Spring Gardening

It’s spring time!

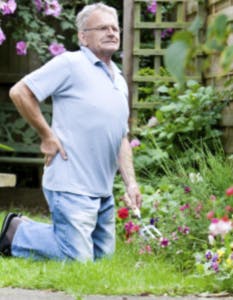
This means time outdoors and spring-cleaning. Needless to say, it’s also a time of potential low back pain as many people who have been less active over the winter suddenly thrust themselves into fun activities and chores.

Low back pain is common.

Low back pain is one of the main reasons people visit their doctor. According to a study by University of North Carolina School of Medicine, more than 80 percent of Americans will experience an episode of low back pain at some time in their lives. This time of year is a popular one for back pain. One popular cause for low back pain is gardening.

Lower back pain park sports pt

Gardening can cause back pain.

If you like gardening, this is an exciting time of year. Here are some quick tips on lowering your chances of injury while gardening from The American Council on Exercise:

  • Use correct posture and form.
  • Warm up before you garden with a 10-minute walk.
  • Make sure all of your movements are smooth and steady.
  • Keep your abdominal muscles taut.
  • Lift with your legs (never your back).
  • Don’t twist your back while digging.
  • Breathe regularly. Exhale when you lift, and inhale as you lower a heavy load.

Even with preventative measures, back pain is a frequent injury.

Park Sports Therapy treatments focus on relieving pain, improving back movement, and fostering healthy posture. Our therapists will design a rehabilitation program to address your particular condition and work with you to help prevent future problems.

Time required for treatment varies.

The time required for rehabilitation varies among patients. If you visited a doctor prior to contacting our team, we will review your physician tests and reports as well as do our own assessments before we develop your specific plan. It is possible that after our assessment, if you have not yet visited your doctor, we will suggest you make an appointment for testing before physical therapy treatment. Our treatments are designed to ease pain and to improve your immediate mobility, strength, posture, and function. We will also teach you how to control your symptoms and how to protect your spine for the years ahead.

Get back to normal and better.

Back pain is uncomfortable. One of the most important steps is to improve your comfort so you can get back to normal activities with improved fitness and awareness. We’ll show you ways to position your spine for maximum comfort while you move, recline, and sleep. Normal activity helps your recovery.

To help calm pain and potential muscle spasm, your treatment plan may include hands-on, manual therapy techniques. To avoid deconditioning of your back, we encourage active rehabilitation. With this active approach, you’ll be shown how to lift and move safely. In addition, aerobic exercises are used to improve your general fitness and endurance including walking on a treadmill, riding a stationary bike, swimming, yoga, and pilates. These activities can relieve the stress of low back pain and they can cause your body to release endorphins into the blood stream – your body’s own natural painkillers.

You’ll take an active role in learning how to care for your back pain. We also always develop an at-home plan for your long term health.

Post surgery treatment.

If surgery is performed by your physician, our team can help you recover faster with a customized post-operative treatment plan.

Gardening can be healing.

While gardening is hard work, it can also promote healing. The Cleveland Clinic reports that it can actually help ease chronic pain in some cases because it’s good exercise and helps relieve stress.

“Gardening reconnects us to the cycles of nature. These cycles are the rhythm of life itself. When we spend time in the garden, we learn to slow down and forget our daily worries.”

We agree. So prepare your self and know there is treatment available if your feel discomfort.

Happy Gardening!


Scoliosis Treatment: Schroth Method for 13 Year Old Female

The Schroth Method for Scoliosis

Scoliosis affects 6-9 million Americans. The primary age of onset for scoliosis is 10-15 years old, occurring equally male and female. At Park Sports PT, we treat scoliosis using the Scroth Method. This specialized form of treatment has shown to greatly ease pain and improve current and potential quality of health for younger and older patients.

One recent case here at Park Sports involved a 13 year old female named Kathy. Kathy was a highly energized, busy, and athletic young teen. She danced ballet, played lacrosse, and was a competitive swimmer. As is often the case, Kathy discovered she had scoliosis at a regular check up at her doctor’s office. As a result, her doctor monitored Kathy with x-rays every 6 months for a year. They determined that her spine displayed a curve progression over the 12 months. Kathy was also in pain and had to greatly reduce her activities.

Her Diagnosis.

The diagnosis Kathy received from her medical doctor was as follows:

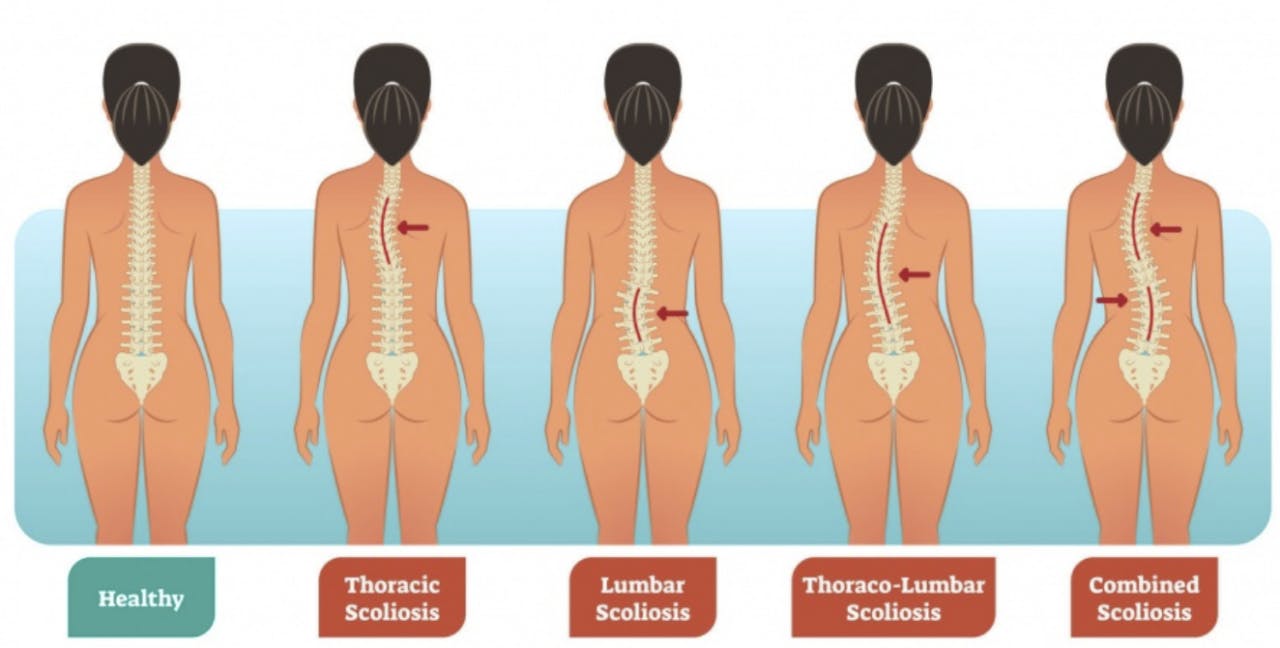
  • Right Thoracic convexity with 11 degree Cobb angle
  • Left Lumbar convexity with 16 degree Cobb angle

Treatment at Park Sports PT.

Kathy and her family decided they wanted to pursue physical therapy. After researching Park Sports PT and visiting our clinics, Kathy began working with our Scroth Method specialist Dr. Kristin Romeo. One of the many aspects of Park Sports Kathy and her family liked was that Dr. Romeo is also an athlete and competitive soccer player and has a personal understanding as to how important body function and health is to athletic performance and everyday activity.

At the start of treatment, Dr. Romeo reviews all medical records pertaining to her patient’s scoliosis. She then performs her own examination, re-taking measurements and preparing her own evaluation. After Dr. Romeo performed these important tasks for Kathy, she designed a treatment plan and schedule.

Excellent results.

Kathy visited Park Sports PT 22 times over the course of three months. After these three months, Kathy was pain free and resumed her full slate of activities. In fact, her Left Lumbar convexity, which was 16 degrees when treatment began, was 11 degrees after three months. Kathy’s family purchased most of the Schroth equipment we used in her sessions at our clinic for home use to help Kathy continue her at-home plan.

If you or someone you know has been diagnosed with Scoliosis, the Schroth Method might be a perfect solution for less pain and better future health. For more information on the Schroth Method, Park Sports PT, and a consultation, please visit us HERE. Park Sports PT is a Participating Member of the Hospital for Special Surgery Rehabilitation Network.

Treating Scoliosis with The Schroth Method

The Schroth Method for treating Scoliosis

Park Sports PT offer patients who have been diagnosed with Scoliosis a highly experienced team focused on the Schroth Method. This specialized form of treatment has shown to greatly ease pain and improve current and potential quality of health for younger and older patients.

We treat a wide variety of patients at Park Sports PT and one case involved an active 67 year old female named Abby. Abby was used to playing tennis three times a week and walking three miles per day. Pain from her scoliosis rendered these activities impossible. As a result, Abby tried conventional physical therapy on two separate occasions, both leaving her in more pain and desperate for a solution.  Consequently, these events lead her to seek the Schroth Method from Park Sports PT.

Patient Profile: Abby, 67 Year old Female

Abby met with our Schroth Method specialist Dr. Kristin Romeo. At the time of her evaluation, Abby presented with a L lumbar convexity of 42 degrees. Because of this, she was experiencing sever pain in her lower back, both hips, and pain in her neck region. She was in agony and questioned whether she would ever play tennis or walk more than a few blocks unaided again.

After conducting a thorough examination and reviewing all of Abby’s medical records pertaining to her Scoliosis, Dr. Romeo created a customized program of treatment for Abby. They met two times a week for eight weeks. After these eight weeks, Abby started to feel better. For example, she began to walk lengthy distances, first one mile, then two miles, pain free. Dr. Romeo focused on postural changes, specific breathing techniques based upon Abby’s posture and altered the way Abby sat and performed routine physical activities. By meticulously strengthening soft tissue, Abby was able to redefine and re-strengthen her posture.

As of this article, Abby is planning a tennis weekend and is confident she will be pain free.

If you or someone you know has been diagnosed with Scoliosis, the Schroth Method might be a perfect solution for less pain and better future health. For more information on the Schroth Method, Park Sports PT, and a consultation, please visit us here.

Fill out my online form.

The Schroth Method for Scoliosis

 
The Schroth Method for scoliosis utilizes a three dimensional approach to elongate the trunk and correct imbalances of the spine. The goal is to develop the inner muscles of the rib cage in order to change the shape of the upper trunk and to correct any spinal abnormalities.

Developed by Katharina Schroth

The Schroth Method was originally developed by Katharina Schroth in Germany. The method uses customized exercises to return the body’s posture to a more natural position. It is standard treatment for scoliosis in many European countries, and is gaining trust and popularity in the United States.

Scoliosis Symptoms

Symptoms of Scoliosis vary. Pain does not always accompany scoliosis. As a result, scoliosis can present in a variety ways such as abnormal trunk lean, uneven rib cage/shoulders or even back pain. If you suspect scoliosis contact your primary care provider. Prior to Schroth treatment, an x-ray is needed as scoliosis can present differently externally due to overlying musculature and does not give us the full picture. So, knowing the bony anatomy allows us to monitor your progress and tailor your treatment to your specific curvature.

Treatment at Park Sports PT

Getting treatment at Park Sports PT means you are working with certified therapists trained in the Schroth Method. They are partners in your health and wellness. Your therapist will create a personalized plan just for you and your specific condition. Our treatment approach can treat scoliosis patients of all ages. It can also can be utilized to treat in all stages of scoliosis, including after surgery.

Throughout treatment, we look closely at the three-dimensional curve in the spine. We teach patients very specific ways to correct that curve or scoliosis posture. Once patients have recognized their corrected posture, we teach them breathing and muscle activation techniques to hold that correction. Essentially, we help train the motor neurons to sense when they’re in a corrected posture versus when they’re in their scoliosis posture.

The Schroth Method takes a lot of repetition and commitment from the patient to learn these techniques. That’s why home exercises are also recommend at least five days a week for a half hour each time.

Trial results show improved patient outcomes

Several trials have found that physical therapy scoliosis-specific exercises lead to improved patient outcomes. This includes less pain and improved muscular strength, muscular endurance and self-image. In one study, spinal deformity improved in 69 percent of patients who completed Schroth exercises. This compared to only 6 percent in patients who did not complete their exercises. The Schroth Method at Park Sports PT works.

Your Park Sports PT team will create a personalized plan and will help prepare you to work on your strength and posture at home. The result is long term care and a stronger and healthier body.

Contact Us

If you or your child has any symptoms or have visited your primary care provider and are looking for treatment, contact us today to learn more. We are here to help.

Fill out my online form.


Do You Know Why You Have Back Pain? Here’s How You Can Find Out

Are you experiencing low back pain and not sure why? You’re not alone, in fact: 9 out of 10 patients don’t know the primary source of their back pain. The problem is that most people seek treatment after they’ve begun exhibiting symptoms of back pain. While this may seem logical on the surface, here at Park Sports Physical Therapy we encourage our patients to take a more preventative approach to their wellness. At Park Sports, we understand how bothersome it may be to have the stress of back pain added to your daily life. Whether you are just trying to get through the work day, cleaning up after your children, or just taking a walk to get the paper, we know how much worse back pain could make these simple everyday tasks and want to help prevent it. We care about our community and hope to help prevent injuries before they occur/worsen.

The key is to go to a physical therapist before you begin to see the signs and symptoms of back pain. I’m sure that right about now you’re asking, “Why would I do that?” One, because physical therapists are trained to recognize the physical dysfunctions that may one day lead to back pain. And two, because eight out of 10 Americans suffer from low back pain at some point in their lives, so the chances are good that you or someone in our community could become a statistic one day.

Seeing a physical therapist on an annual basis is one of the most effective ways to prevent back pain from occurring in the first place, the way one might see a primary care physician. Doesn’t that sound like the better alternative? Great, now that you’re on board, let’s talk about what you can expect during that annual physical therapy appointment. The first time you go, your physical therapist will collect a complete picture of your medical history. During subsequent visits, it’ll be important to update your physical therapist about any changes to your health during the previous 12 months, but it won’t be necessary to review your entire medical history again.

Next, your physical therapist will perform an examination using a variety of tests and measures including a movement screen. A movement screen is a screening tool that’s designed to identify imbalances in your mobility and stability that may contribute to limited function or other impairments. This gives your PT the ability to see how your back, hips, core, shoulders, knees and ankles perform during a series of carefully selected exercises.

The information gathered during an examination helps your physical therapist to identify changes from one year to the next, a critical step in assessing your risk for back pain and a host of other debilitating conditions. If a problem is identified early enough, then your physical therapist is better equipped to discuss preventive measures instead of designing a treatment plan. And that’s how you identify the root cause of back pain and derail issues before they even begin. Mystery solved.

Our qualified and caring physical therapists here at Park Sports Physical Therapy are here to help! If you feel that you, a loved one, or any residents in the community could benefit from physical therapy please do not hesitate to give us a call at any of our locations in Brooklyn. We have locations in Park Slope, South Slope and Clinton Hill.

Unsure if physical therapy is right for you? Give us a call today and our administrative staff will be happy to accommodate!

Brooklyn Half Marathon Crash Course Recap

We had a blast last night hosting the Crown Heights Running Club at our Clinton Hill location for our Brooklyn Half Marathon Crash Course.

The presenters included physical therapist and owner of Park Sports Physical Therapy, Boris Gilzon, PT, DPT, OCS, CHT, Certified Coach for the Road Runner Clubs of America, Nate Turner, and nutritionist, Tara Mardigan, MS, MPH, RD, AKA “The Plate Coach.”

They shared a lot of great information with us. This post will serve as a brief recap of some of the material that was reviewed.

Dynamic Stretching VS Static Stretching

Dynamic stretching is preferred over static stretching. You will want to focus on “warming up” your muscles before a run or undertaking any form of exercise. This can be in the form of jumping jacks, lunges, or any other full body movement. Core exercises are strongly encouraged.

There is no correlation between stretching and preventing injury, but stretching is still very beneficial in other ways. Boris recommends holding a stretch for twenty seconds or more for the muscles to get the full benefit of the stretch.

Tara recommends staying properly hydrated as that also plays a role in the performance and flexibility of your muscles.

Anywhere from 7-10 minutes of dynamic stretching will be enough to get you warmed up.

Cross Training

Cross training is useful, but depending on your goals, whether they be increasing mileage, speed, or endurance, nothing can replace running.

Boris and Nate both recommend strategic planning in terms of setting up a schedule for training to achieve your goals. The example given was a six-month training schedule. Boris recommends starting off with a light workout and running schedule at the very beginning and then increasing the intensity of theworkoutss as time progresses. This allows the body to adapt.

According to Nate, you should plan ahead and find ways to stimulate the climate of the actual race. For instance, if you are training during the colder seasons for a race that takes place during warmer seasons, you should try running in warmer temperatures some days. This could be done on a treadmill indoors with higher heat. Don’t forget to stay hydrated during these experiments!

Identifying Pre-Existing Structural Issues to Avoid Injury

Having a pre-existing injury or structural issue can lead to more serious injuries down the line. Both Nate and Boris strongly advise against working through the pain during training. Structural issues can be evaluated by a medical professional, physical therapist, or even an athletic trainer trained in identifying imbalances in the body.

A physical therapist will be able to assess your body’s strengths and weaknesses and will be able to offer valuable insight as to how you can improve your odds to avoiding injury, whether they be through strengthening exercises, modifying certain movements, correcting postural issues, or stretching and manual therapy.

If you are interested in getting a movement evaluation done by one of our physical therapists, schedule your appointment here.

Increasing Mileage Safely

Boris and Nate mentioned when training for a half marathon or even a full marathon, it’s best to work your way up to running that distance.

Instead of flat-out running thirteen miles, you could distribute a certain amount of miles each day that adds up to the full thirteen miles.

For example, on Monday you run four miles, Wednesday you run four miles, and Friday you run five miles. You can slowly increase your mileage safely in this manner instead of just deciding to run ten miles one day.

Nutrition for Runners

Tara put together an excellent handout reviewing some excellent advice in terms of nutrition, rest periods, and more. Here’s a PDF of the handout for those of you who couldn’t make it last night.

Wrapping Up

To those of you running the Brooklyn Half Marathon, we wish you the best of luck. You have trained hard and whether you aim to break a new personal record, finish the race, or have a set time that you would like to finish, we are here to help.

Want to learn more about Park Sports Physical Therapy and get started? Fill out this form here.

AlterG Anti-Gravity Treadmill

We are offering a 20% discount to Crown Heights Running Club’s members interested in trying out the AlterG Anti-Gravity Treadmill.

Schedule your first run today! Call 718.230.1180

Learn more about the AlterG treadmill and our rates here.