Gait Training With People With Amputation

Gait training is a type of physical therapy that can improve many people’s ability to stand and walk. Doctors will likely prescribe gait training to people suffering from an injury or illness that affects their ability to get around normally. Gait training is known to help strengthen muscle and joints, improve balance and posture, help develop muscle memory, build endurance, retrain legs for repetitive motion, and increase overall mobility.

Especially for those dealing with amputation of their lower limbs, it could also increase your risk of developing other illnesses like heart disease and osteoporosis. Whenever patients choose gait training over immobility, they are protecting and improving their health. 

Physical therapists like those at Park Sports Physical Therapy work with lower limb amputees and believe that gait training plays a vital role in laying a solid foundation for the long-term success of their patients. Read on as we describe the positive impacts of gait training on people with amputation and what is involved in that training.

Here’s What You Need To Know About Gait Training For Amputees

Did you know that of the estimated 1.6 million people in the United States who suffer from limb loss, over 80% of those people have a lower-limb amputation? When these individuals fail to achieve prosthesis-assisted ambulation, or the ability to walk and move around on their own, they increase their risk for physical deterioration and several other health conditions. Without the help and guidance of a physical therapist, these amputees can develop characteristic gait asymmetries, including altered limb loading patterns, which can increase pain and metabolic costs. Over time, they’ll likely be prone to reduce their energy consumption, leading to health risks and immobility in general.

Let’s discuss why gait training is necessary and what can be expected with that type of training.

Why Is Gait Training Important?

Almost every lower-limb amputee is simply looking to walk “normally” again with their prosthesis. Though “normal” has several definitions, physical therapists define it as a symmetrical gait pattern that falls within the average range in terms of rate of speed, posture, limb positioning, step length, and more. 

Generally, the higher the amputation level, the more gait deviations (also called limps) show up. Limps arise because with amputation, muscle, sensory receptors, and leverage are lost. Therefore, a person with a higher amputation level typically has a less stable and less energy-efficient gait pattern than others with a lower amputation level. Physical therapists across the world will agree that recent amputees will have the most to gain with gait training because using a prosthesis is a new challenge, and it’s important to establish healthy habits early on.

The best gait training programs will include aligning the prosthesis to ensure that all components of the equipment are positioned property to optimize the gait pattern. In addition, the prosthetist provides initial gait instructions to ensure that the person using it can stand and walk with stability and decrease the risk of falling. 

Especially at these early stages, it is best to enlist the help of a physical therapist for regular gait training sessions. When consistent stability is established, other exercises can be taught to help encourage walking without support. Most physical therapists will agree that even amputees who have used a prosthesis for years can benefit from gait training. Whether patients are looking for a tune-up or learning a new skill, it’s important that amputees establish close communication with their physical therapists. This is especially critical considering how sophisticated today’s prosthetic components are, including their need for careful adjustments. 

What Is Involved With Gait Training With People With Amputation?

Here are some of the things an amputee can expect when starting a gait training program:

Typically, it starts with pre-gait activities that are meant to help establish prerequisite skills that ultimately help prosthetic ambulation (the ability to walk without physical assistance). These include donning and removing the prosthesis, setting static standing balance, sit-to-stand transfers, and dynamic weight shifting.

Patients can also expect part-to-whole gait training, which consists of practicing the individual components and building up to the complete tasks. This practice allows physical therapists to identify deficiencies so that they can prioritize training and improvement in those areas.

Treadmill training is a very popular means to help new prosthesis users increase their stamina in a safe and controlled environment. Treadmills provide a consistent and level walking surface that is free from environmental obstacles. Additionally, it allows the therapist to focus on gait mechanics and provide live feedback. 

A physical therapist who focuses on gait training with people with amputation might also use bodyweight-supported training as a variant of treadmill training. Typically, it involves using an overhead harness so that patients can practice walking using only a small percentage of their body weight. This allows individuals to learn and practice proper gait mechanics using less weight that can progressively increase as they develop strength and confidence.

Gait training might also employ psychological awareness training which encourages the patient to be mindful of certain gait variables. This could include step and stride lengths, side-to-side movement symmetry, pelvic rotation, and more. Again, the purpose is to help patients consciously monitor their performance with respect to their goals.

Let Park Sports PT Help You Today

At Park Sports Physical Therapy, we are introducing gait training programs for people with lower-limb amputation and including Prosthetists in our team at the Clinton Hill Clinic. The key to a successful prosthetic training program is to instill good habits early on and focus on quality movements that our patients can practice on their own. This includes ensuring each of our patients:

  • Can correctly put on and remove their prosthesis,
  • Establishes a proper center of balance and posture (which minimizes compensations)
  • Shows prosthetic stance control with single-leg activities
  • Has undergone thorough pre-gait training to help break down improper gait training and improve motor control
  • Can handle functional training
  • And more!

Our goal is to help our patients understand the fundamentals and establish meaningful goals so that we can work together to create a more normalized gait pattern. We’ll help minimize gait deviations and focus on one thing at a time so that our patients can master higher-level activities over time. Our mission is to help you get comfortable in your own environment and get back to doing the things you love. 

Get in touch with our experts today, and let’s discuss your goals.

Why Strength Training For Triathletes Is Essential

Triathletes are great at many things, but after all the time they spend running, riding, and swimming, they might forget something important – strength training. Strength training for triathletes can be a significant advantage for several reasons. In addition to its performance benefits, we think that strength training also plays an active role in keeping athletes healthy and injury-free. While adding another activity to your exercise routine might sound daunting, you can become an all-around better athlete with a simple plan that doesn’t have to take more than half an hour a week. Building your strength will make you faster and keep you feeling stronger as you make your way to the finish line.

Read on as we describe why strength training for triathletes is important.

The Importance of Strength Training For Triathletes

Successful triathlon training should include strength training. It helps improve muscular endurance to help prepare the body for the demands of training and racing. This kind of exercise helps to increase your power output and also prevent injury.

Any athlete with a well-balanced strength training plan has the ability to efficiently transfer power from their body into their run, their swim, and their pedaling. On the other hand, an athlete who lacks strength throughout their body might experience a lack of power due to poor postural control, reducing the amount of force they can produce during the triathlon.

Postural strength is crucial when it comes to injury prevention. As your workouts get more challenging, your body requires the proper support from your muscles to maintain good form for all three areas of the race. When your form is weak, you become more susceptible to injury. You’ve already heard that you need good core strength, and it’s because core strength creates a stable base for all the activities you do on a daily basis.

When you ask a physical therapist, they’ll tell you it’s imperative to work on the lateral and rotational musculature of the hips and core. These muscles are used to help you move side to side and help prevent any unwanted twisting motions of the pelvis, trunk, or legs when running and biking. When these muscles are strong, your workout will be much more efficient and keep you from straining unnecessarily. Since running and biking is a straight-forward motion, you’ll naturally be working the muscles in the front and back of the hips and legs. Therefore, adding a strength program that includes strengthening the lateral muscles will help you improve stability.

Better Performance

Many of the best triathlon coaches will tell you that strength training for triathletes is a vital part of any multisport training program. With triathlons, there is both upper body and lower body training involved.

Research supports the idea that strength training and improved endurance performance are linked. The Journal of Strength and Conditioning Research looked at several studies and concluded that the analysis showed a 4.6% improvement in running overall among those trained along with their regular endurance training.

Additionally, another study looked at both runners and cyclists. After a ten-week resistance training program, participants showed an increase in leg strength by 30%, a 13% improved running time, and cyclists could ride for 14 more minutes than they could initially.

Reducing Injuries

While performance benefits might appeal more to triathletes, as physical therapists, we encourage strength training as a way to prevent injuries. Injuries are often caused by muscle imbalances and chronic weaknesses in certain areas of our bodies. A basic strength training program is the best way to increase your muscle tissue strength and connective tissue, too, like tendons and ligaments. As your tissue is strengthened, you’ll be able to put in more training without injury, which leads to better and faster performances.

Break Your Training Into Phases

Just like with all triathlon and marathon training, strength training should be periodized throughout the year. You should start with the general strengthening and preparation phase, which lines up with the offseason and helps you build triathlon training phases. This period is when you increase your overall base strength. The offseason is when you should also take a break from the main activities in a triathlon. Hitting the weights will be a nice change of pace from the hardcore training you might be used to. We might even suggest that you increase your resistance in this phase, as you don’t necessarily need to worry about soreness or fatigue for your next run, bike, or swim workout. In particular, heavy-resistance training has been shown to enhance both short and long duration endurance capacity in high-level endurance athletes, like those who participate in triathlons. The healthier you are, the better you will be able to handle increases in workout intensity as the season progresses.

After the offseason and build phases, then comes the pre-racing stage. The pre-racing phase will require that your strength training become more specific and focused on building power and speed. This is where plyometrics comes in. Plyometrics, also known as jump training, are exercises in which muscles exert maximum force in short intervals, the goal being to increase both speed and strength.

During the competitive phase, the idea is to maintain the strength you’ve built throughout the season. Resistance training is reduced, and you can continue focusing on training and practicing for your races.

Once the season is over, take some time off to rest and recover. During this time, strength training is low and shouldn’t be done more than a couple of times a week. You want to let your muscles rest, but you also don’t want to lose the fitness you’ve earned before the next cycle.

Consult A Physical Therapist

If you are new to strength training or new to triathlons in general, you should definitely consult a physical therapist to help guide you. They’ll show you the proper technique and help you focus your strength training sessions on your specific needs.

Even if you’re an experienced triathlete, it’s never a bad idea to have a functional assessment and evaluation from a licensed therapist to learn what you need to work on so you have an injury-free and successful season.

The experts at Park Sports Physical Therapy would love to set up a consultation to see how we can help you maintain your health and wellness so that you can continue to do the things you love.

Common Cycling Injuries

Common Cycling Injuries Can Be Avoided.

Most common cycling injuries can be avoided. Unfortunately, we do not have full control of sudden impact injuries; accidents happen. Covid-19 changed our transportation habits.  With more cyclists on the road, there are more chances of car-to-bike accidents and bike crashes. The lowest cost and the simplest way to prevent the most common injury ( head trauma) is to wear a helmet. This post is focusing on the conditions which we can control.

Hand and Wrist Pain in Cyclists.

The weight distribution on the bike should be such that 60 percent of the weight is positioned on the rear of the bike. If the seat post is too high or the handlebar is too low, then your arm and wrist take undue pressure. This results in too much weight at the front of your body. If the handlebar angle is not set correctly it may force the wrist joint into an abnormal position. This may result in ulnar nerve neuropathy. The ulnar nerve at the wrist level is vulnerable to repetitive injury. The anatomical structure at the wrist level where the ulnar nerve is passing is called the Guyon canal. It is in a unique location where the ulnar nerve is susceptible to compressive injury. Tingling in your Pinky and Ring finger is a sign of ulnar nerve compression. Wrist joint pain is another common condition in cyclists. The low position of the handlebar forces the wrist joint into more extension which in turn accelerates wear and tear of the small carpal bones that evolutionarily are not adopted for weight-bearing.

 Spine: Neck and Lower Back Pain in Cyclists

The low position of the handlebar forces the rider to hyperextend their neck to look up in order to see what is ahead. It causes compression in the cervical spine and creates muscle imbalance between the muscles in the front and the back of the neck. One possible solution to alleviate pressure on your arms is to opt for a compact or shallow handlebar. You can also adjust your handlebar position by loosening the stem bolts and rotating the stem bar upwards. This will reduce your arm’s reach.

Lower back pain in cyclists is the most common injury. A recent study has found that 58 percent of all cyclists experienced lower back pain in the previous 12 months. Because cycling is a low impact sport, it is surprising as to why the lower back pain is so common among cyclists. There are 2 possible reasons: incorrect bike geometry and muscular insufficiency. If you are planning a long time in the saddle make sure that your bike is properly fitted. There are professional services that can perform this job. Your bike is not at fault.

Muscular insufficiency can be addressed in physical therapy.  Sitting in the saddle for a long time causes the muscles behind your back, hamstrings, and calves to naturally shorten. It changes the length-tension ratio of the muscles and creates multiple issues affecting your lower back. Prolonged pedaling causes fatigue and produces undesirable muscle movement patterns in the legs and spine. It affects your back by altering the spinal posture. Lower back pain in cyclists is associated with excessive lumbar spine flexion, which in turn is associated with the reduced activity of a key stabilizer back muscle- multifidus, located in the deep layer of your back. A comprehensive lower extremity stretching program and a core stabilization program for cyclists are of paramount significance in preventing lower back dysfunction.

Knee Pain and Possible Quick Fixes.

Before you consult a medical provider for the knee pain from cycling, check your bike fit.

Pain in the front of your knee is a result of a powerful and continuous force that your quadriceps muscles exert on your knee cap. The force could be detrimental if it is applied at the wrong angle and direction. Bike fitting issues like saddle height, saddle fore, and crank length affect the pressure on your knee cap by producing an abnormal force. If the saddle is not properly adjusted in the vertical and horizontal direction the force is increased, causing more irritation. All those issues could be avoided. Understanding the basic principles of biking mechanics can save your time looking for remedies and let you enjoy the things you love to do!

But if you need us, Physical Therapists at Park Sports have a unique understanding of the mechanical aspect of cycling. We are passionate about cycling and some of our team members are advanced level multi-sport athletes that include cycling. Our office is located at Prospect Park, a major cycling venue in Brooklyn. We are here to help!

Addressing Neck, Shoulder and Back Pain with a Scalenes Trigger Point Release at Home

In the context of physical therapy, massage therapy, orthopedics and other clinical settings, you may have heard the term Trigger Point being used to explain the cause of some of your symptoms. Today, we are going to focus on what these trigger points are, how they might contribute to some of the symptoms you may be feeling, and describe in detail a Scalenes trigger point release technique. Why do we care specifically about the Scalenes Muscles? Your scalenes, as we will describe below, are frequent culprits when it comes to neck, shoulder, scapula and arm pain. In addition, they are often affected by anxiety, stress and poor posture, all of which we are dealing with more than ever during these challenging times!

For additional information regarding trigger points, we highly recommend Clair and Amber Davies’s The Trigger Point Therapy Workbook: Your Self-Treatment Guide for Pain Relief.  In addition to more information on the scalenes trigger point release, there you will find excellent descriptions of common trigger points, referred pain patterns, and self-treatment guides.  Unless otherwise specified, most descriptions and images below come from this very helpful resource.

What are “Trigger Points”?

Clinically speaking, the term Trigger Point refers to any painful point that develops within muscle tissue. They can be present within any muscle, and tend to develop after long-term or inappropriate stress is placed on that muscle (see below for examples of stressors). Trigger points can be thought of as “active” or “latent”. Fernández de Las Peñas et al (2017) conducted an international consensus review to establish clinically relevant definitions for “active” versus “latent” points, and came up with the following distinctions:

  • Active Trigger Point: causes a clinical pain complaint
    • Always tender,  and may prevent full muscle lengthening (make your muscles feel tight)
    • Cause muscle weakness
    • When compressed, refers a patient-recognized pain, and/or motor phenomenon (i.e. twitching)
    • When stimulated may cause a local twitch response of muscle fibers compressed within the patient’s pain tolerance
  • Latent Trigger Point: clinically inactive with respect to spontaneous pain
    • Painful only when palpated (meaning “touched” or “pressed on”)
    • May have all the other clinical characteristics of active TPs
    • Always has a taut band that increases muscle tension and restricts range of motion

What are your Scalenes?

The Scalenes are a muscle group that help stabilize, flex (bend forward), laterally flex (tilt the head to the side), and rotate the neck. They also help raise your upper two ribs when you inhale, meaning they are working every time you breathe. However, they work HARDEST during labored breathing, i.e. during vigorous activity, coughing, sneezing, or during periods of anxiety (hence, why they may be more bothersome to some people at this time!)

Where are your Scalenes?

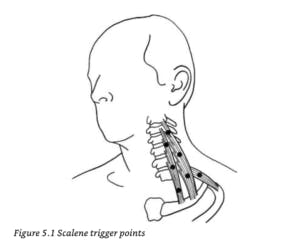
  • Anterior Scalene: the front-most scalene muscle, lies between the SCM (sternocleidomastoid) and the neck vertebrae and is almost completely hidden
  • Middle Scalene: is behind the anterior scalene, more on the side of the neck, with its lower half free of the SCM
  • Posterior Scalene: almost horizontal, behind the middle scalene in a triangular groove just above the collarbone (clavicle) and below the front edge of the upper trapezius (the bulkier muscles that help you shrug your shoulders)

What do Trigger Points in the Scalenes Feel Like?

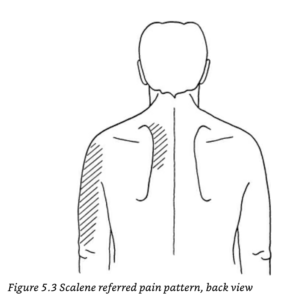
As described above, trigger points themselves can create a number of different sensations. If you have trigger points throughout your Scalenes that are more active, you may feel some pain or symptoms throughout your shoulder blade/scapula, shoulder joint, side of your arm, forearm and fingers, up to your neck, into your chest, or in a combination of some or all of these locations.

Trigger points in your Scalenes, when pressed on, can produce particularly “strange” sensation, sometimes described as “nervey”, “weird”, “burning” 

What causes the development of trigger points within the Scalenes?

1. Not-So-Great Breathing

Improper breathing patterns such as chest breathing (breathing so that your chest rises with every breath) or nervous hyperventilation will overtax the scalene muscles. Who is prone to these types of breathing patterns?

  • Those experiencing emotional tension, anxiousness or stress (for example, anyone who might currently find themselves in either social isolation OR working in close proximity with ill individuals…).
  • Individuals with chronic respiratory conditions such as asthma or emphysema that make breathing more labored.
  • Individuals with new or worsening respiratory conditions such as pneumonia, bronchitis, allergies, or a common cold that result in constant coughing.

2. Improper Body Positioning

  • Working for long hours with the arms out in front of the body can be very stressful for your Scalenes, including working at your computer. Pulling, lifting, and carrying heavy loads can also cause stress, including rearranging heavy furniture or an intense day of spring cleaning.
  • Carrying a heavy grocery bags or backpacks.
  • Maintaining improper posture – your Scalenes are largely responsible for managing the weight of the head, which is quite heavy! Any posture you assume where your head is not supported, or that puts your head in front of or behind your upright torso creates an imbalance and puts an additional burden on them.

So, what can you do at home to address symptoms that might be caused by Scalenes Trigger Points?

First, try to adjust some of the habits that might be creating them in the first place:

  • Focus on proper diaphragmatic breathing. Diaphragmatic breathing refers to breathing so that your belly rises with every breath instead of your chest or shoulders. This type of breathing is often used during meditation and relaxation sessions and can help with mental as well as physical stress. This video from Mass General Hospital helps demonstrate good diaphragmatic breathing technique.
  • Focus on maintaining good, neutral posture in sitting, standing and sleeping positions. To do this while sitting and standing, you can think about “reaching” your head straight up towards the ceiling, almost as if it is being pulled up by an invisible thread – feel yourself “creating space” in between each vertebrae as you elongate your spine. While lying down, focus on giving your head and legs proper support so that your spine, head and hips remain as aligned as possible. For some quick tips, you can watch this video, or feel free to reach out to a Physical Therapist for a more targeted consultation!


Next, try a Scalenes Trigger Point Release technique!

STOP – CONTRAINDICATIONS: Before moving onto the technique, it is important for us to make you aware of some of the reasons you should not continue. We always recommend consulting with a healthcare professional before attempting any self-release technique if there is a possibility of fracture, nerve damage, cardiovascular disease or blood vessel compromise in the area you plan to massage. If you have been through a recent physical trauma or accident, or have experienced any of the following symptoms, do not attempt this technique, and seek medical attention:

  • Dizziness and/or unsteadiness
  • Diplopia (double vision or visual field loss)
  • Dysarthria/dysphasia (difficulty speaking or finding the right words)
  • Dysphagia (difficulty swallowing or sudden hoarseness of voice)
  • Drop attacks (sudden collapse without loss of consciousness)
  • Nystagmus (uncontrolled sideways movement of the eyes)
  • Nausea or vomiting
  • Numbness or paraesthesia (altered light touch sensation), particularly around the mouth


Scalenes Self-Trigger Point Release Technique 

In order to fully address any pain or symptoms that might be coming from scalenes trigger points, it is important to move as methodically as possible through all 3 major branches of the scalenes: Anterior, Middle & Posterior. Below we have described how to find each branch and perform your self-release technique. 

General Guidelines:

  • Clip or file your fingernails prior to starting this technique – long nails are not your friend when digging into the side of your neck!
  • Use short strokes in either a straight line, no more than half an inch long, or in small circular strokes, both performed with 1-2 fingers. For hard to reach places, feel free to use a lacrosse ball or tennis ball (this applies more to techniques being used for muscles of the back, hips and legs that are bulkier and/or harder to reach with your hands).
  • Make sure you focus on performing strokes at multiple points throughout each muscle, instead of focusing on just one point over and over. 
  • Focus on performing 10-12 strokes per tender spot, 3-6 times per day
  • When pressing on a trigger point, you should feel no more than a 4 or 5 on a scale of 1-10 pain, 1 being very minimal pain, 10 being “emergency room level pain” or “the worst pain you have ever felt”
  • If you can feel your pulse under your fingers, do not press down! You have found your carotid or subclavian pulses, which are great for helping you know you are alive, but not great for finding places to press down hard.
  • Don’t be too concerned about getting the massage exactly right. As long as you are aware of and adhere to the contraindications listed above, pay attention to your symptoms and pain level, avoid pressing on pulse points, and check-in with how you are feeling before and after your self-treatment, it is highly unlikely that you will cause yourself any harm! That being said, if you feel at all uncomfortable with performing this technique, or have additional questions you’d like answered before trying it out, feel free to reach out to a Physical Therapist for help!

Anterior Scalene

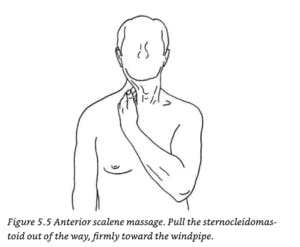
  1. Get your fingers between the neck vertebrae and the sternocleidomastoid (SCM) – the SCM will feel like a “rope of muscle” that runs from your ear down to your sternum.
  2. Grip the SCM between the fingers and thumb, of the opposite hand, as if you were going to massage it. 
  3. Let go with your thumb and with your fingers pull the entire SCM about two inches toward the windpipe. 
  4. With your fingers, press directly back – this should pin the anterior scalene against your vertebral column in order to create nice pressure underneath your fingertips.

Middle Scalene

  1. Repeat steps 1-3 above.
  2. Starting just below your ear, press into the side of your neck. You may feel some “bony knobs” under your fingertips – these are the transverse processes (or sides) of your vertebrae. You want to make sure that you are in front of these knobs. Otherwise, you are likely massaging muscles in the back of your neck (which, to be fair, is not bad at all, but just not what you are looking to do right now).
  3. You can confirm that you are in the right position by quickly taking a few short, repeated breaths – you should feel the muscle twitching below your fingers. 
  4. On the side of the neck here, use the same stroke you used for the anterior scalene. 
  5. Follow this muscle all the way from just below the ear down to the middle of the collarbone.

Posterior Scalene

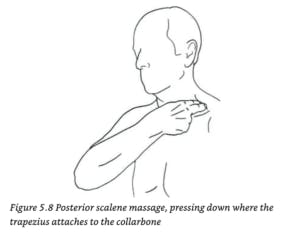
  1. Push your middle finger under the front edge of the trapezius muscle near where it attaches to the collarbone. 
  2. Press downward and drag your finger an inch or so toward your neck in a short, straight line parallel to your collarbone. In this case, the bone you might feel under your fingers is your first rib.


Feel free to try this Scalenes trigger point release out at any point throughout your day. If you have any questions or comments, certainly feel free to reach out! We are open for new visits and telehealth sessions to address your needs throughout this time.  Thanks for reading!

References:

Davies, Clair. The Trigger Point Therapy Workbook: Your Self-Treatment Guide for Pain Relief (A New Harbinger Self-Help Workbook) (p. 101). New Harbinger Publications. Kindle Edition. 

Fernaindez De Las Penas, C., & Dommerholt, J. (2017). International Consensus on Diagnostic Criteria and Clinical Considerations of Myofascial Trigger Points: A Delphi Study. Pain Medicine, 19(1), 142-150. doi:10.1093/pm/pnx207

Also, feel free to read up on more helpful techniques at home, such as Telehealth for Brooklyn-based Physical Therapy and Increasing Shoulder Range of Motion.

Why Do I Have Tennis Elbow?

Why Do I Have Tennis Elbow?

You may recognize this situation: The doctor diagnoses your elbow pain as something called tennis elbow–but you’ve never played tennis at all! Don’t be confused by the name – tennis elbow is a common complaint, and a background in sports isn’t necessary to be afflicted.


The medical term for tennis elbow is lateral epicondylosis, referring to the tendons attached to the bone in your arm near your elbow. These are the tendons that extend the wrist and fingers. But after episodes of repeated gripping or lifting, these tendon anchor muscles can become inflamed or degenerated. When this happens, the attachment of these tendons becomes weakened, and places a strain on the muscles. This can lead to intense pain. It often starts at the bony point on the underside of the elbow and radiates down your forearm. The severe pain can wake you up at night, or stop you from lifting your morning cup of coffee. 


Treatment and Therapy

The treatment of tennis elbow targets improving the health of these strained tendons. Restoring strength to the connected muscles is also critically important. The first thing that doctors usually recommend to treat this condition is nonsurgical management. This can include anti-inflammatory medications or steroid injections into the painful area. But in the early stages, a referral to a hand therapist is also highly recommended!


An occupational therapist, or a therapist who specializes in working with the hand, wrist, and elbow, will identify what is needed to alleviate the pain in the short term and restore the tendon’s health in the long term. Hand therapists use manual techniques that will help you to move smoothly and comfortably through the stages of healing. In some cases, the therapist may need to customize a splint or brace for you. They will also develop a program of exercises and stretches that you can do at home when you are ready.


Whether you’re Roger Federer or an Average Joe, tennis elbow can be a painful, stressful ailment. But a good therapist is key to achieving your goals when it comes to recovering, and is the first step on the road to getting you back in the action!


Article written by Joanne E. Petrunik, OTR/L. Joanne specializes in Hand Therapy, Upper Extremity Rehabilitation, Sports Injuries and Pre- and Post- Operative Rehabilitation. You can request an appointment with Joanne at one of our locations.


Postpartum Diastasis Recti – A Pelvic Floor PTs Perspective

As a pelvic floor physical therapist, almost every new mom I treat has concerns over diastasis rectus abdominis (DRA) or “diastasis recti.” This condition happens during and after pregnancy because of the stress placed on the rectus abdominus (the famous “six pack” muscle) as a fetus grows within the uterus. DRA typically develops in the second or third trimester, when the fetus is growing most rapidly. Certain factors, like older age and having multiple pregnancies, may make a woman more susceptible to developing DRA. Simply put, the connecting tissue between the two sides of the abdominal wall called the linea alba, stretches and separates. Some women heal on their own, but others may not.

While brushed off as commonplace (which it is!), DRA is not insignificant. Any woman experiencing changes within her body is justified in her concerns, whether they are physical or aesthetic. Concerns I often hear are, “Is this just something all women have to accept? Why did no one tell me this could happen?” And the most common one… “Will it ever go back to together?”

The good news is that women are smarter and more empowered than ever before, and many are now seeking help from a pelvic floor physical therapist. If you are affected by postpartum DRA, pelvic floor physical therapy can be a highly effective approach!

Why is it important to treat diastasis recti?

The abdominal muscles support your posture, help control movement, and protect the internal organs (i.e. bladder, uterus, and rectum). If you are affected by DRA, you may therefore be at an increased risk for injury. The symptoms associated with DRA combined with the the many stressors that come with having a new baby can negatively affect a woman’s quality of life.

What does diastasis recti or DRA feel like?

The separated abdominal muscles usually do not cause pain, but the sequela of DRA can lead to dysfunction within the body. Symptoms usually develop gradually over the course of a woman’s pregnancy, and may linger following labor and delivery. Symptoms associated with DRA include:

  • Weakness within the midsection.
  • A visible and palpable gap between the rectus abdominis muscle.
  • Pelvic-floor muscle dysfunction.
  • Urinary or bowel problems (incontinence, leakage, constipation, etc).
  • Poor posture.
  • Occasionally low back, pelvic, or hip pain.

What is a diastasis diagnosis?

A physical therapist will review your medical history and symptoms. This includes questions related to your pregnancy, labor, delivery, breastfeeding habits, and physical recovery. They will also assess orthopedic factors, including your posture, range of motion, and muscle strength. Lastly, they will do a gentle abdominal muscle examination to note the degree of separation.

What should I expect in terms of treatment?

If you do develop DRA, the earlier you see a physical therapist, the faster you will be on your road to improved function! Treatment strategies include:

  1. Education. Your PT will be your coach and your teacher. They will guide you through a safe and effective plan of care and teach you movements to avoid early on (i.e. not to perform traditional sit-ups or crunches).
  2. Bracing. Sometimes taping or bracing the abdominal region can provide external support for women with DRA. It can also work as a cue when relearning the correct position for your midsection.
  3. Postural Training.  One of the most important components when treating DRA is improving postural control. This will involve activating core muscles such as your transverse abdominus (a deep abdominal muscle) and your pelvic floor without overusing the rectus abdominus muscle. In addition to strengthening, stretching plays a big role in postural control. While we often think all the muscles become weak during pregnancy, others may actually become overactive and tight. Your physical therapist will help you restore this balance. Lastly, they will help you transfer your gains to real life and review proper form when performing daily activities, such as lifting and carrying your baby.

In sum, DRA is a very prevalent condition that can be addressed with guidance from a skilled PT. If you have any questions related to diastasis recti or would like to get started on a PT program, I am happy to help!


Written By: Lacey Salberg

Lacey Salberg PT, DPT
Contact:
Park Sports Physical Therapy
Dr. Lacey Salberg, PT, DPT
lacey@parksportspt.com


Increasing Shoulder Range of Motion

Increasing shoulder range of motion after injury or surgery is key to recovery and shoulder performance. Genya Royfman, PT, DPT is a graduate of UC Santa Barbara and received her Doctorate of Physical Therapy from Hampton University. She’s been a part of the Park Sports team for about a year now and has a passion for treating shoulder injuries. Genya, who is a former high school football player and currently an avid rock climber, has herself had multiple shoulder surgeries and experiences with PT as a patient. When it comes to shoulder issues and recovery, Genya says clearly, “I can relate.”

GENYA ROYFMAN, PT, DPT

The Shoulder and injury.

The shoulder is a complex joint built to allow movement in many directions: forward, backward, around in a circle, and away from the body. Muscles and ligaments help keep the shoulder stable and secure in your shoulder socket. Injuries can occur whether you are an athlete, super active, or an occasionally active weekend adventurer or DIYer.

Quick overview of your shoulder.

Your shoulder joint is a ball-and-socket joint. The head of the humerus (upper arm bone) is the ball and the scapula (shoulder blade) forms the socket where the humerus sits.

The scapula and arm are connected to the body by multiple muscle and ligament attachments. The front of the scapula is also connected to the clavicle or collarbone through what is called the acromioclavicular joint.

As you move your arm around your body, your scapula must also move to maintain the ball and socket in normal alignment. Keeping this alignment steady and sturdy is a life long challenge.  Injury to the multiple muscles and ligaments that keep everything functioning is quite common. Recovery is not always so simple however.

Range of Motion.

Shoulder Range of Motion or ROM is the measurement of movement around a specific joint or body part. ROM can become limited due to joint overuse, arthritis, or sudden trauma to the joint.  Lack of ROM is a strong indicator of injury, not to mention, it can limit your daily functions and cause persistent pain and discomfort. Working with a physical therapist, you will increase your range of motion and strengthen your joint. This occurs through joint manipulation and specialized exercises.

Like all Park Sports therapists, Genya performs detailed research into her client’s history and current injury before any treatment begins. After Genya creates a plan for her patient’s shoulder injury treatment or post-op plan in conjunction with her patient’s surgeon, often she is initially focused on strengthening scapula involvement. “I make sure the scapula is properly engaged, people tend to forget about the shoulder blade.” There are a number of early stage treatment exercises she typically begins with.  These will help work the scapula and also test early treatment ROM.

Shoulder Blade Squeezes.

It is important to engage the upper trapezius muscles at the start of treatment. Genya’s shoulder blade squeezes address the mid to lower trap muscles. As a result, they loosen the upper trap muscles. This helps to relieve neck and shoulder discomfort. Your trap muscle consists of three parts and has many different functions—lifting your shoulders, holding up your neck and head and moving your shoulder blade. When this muscle is tight, it affects your entire body. Tight traps are significant enough to influence your training, recovery, and overall well being.

Scapular Wall Slide.

The Scapular Wall Slide is another early stage exercise designed to improve scapula stabilization. Genya positions her patient in front of a wall and squeezes their shoulder blades.  The patient then slides their forearm up the wall maintaining contact with the wall the entire time. Wall slides train the muscles surrounding the scapula for both dynamic and static stability – controlling the position of the scapula during arm movement.

Treatment length varies.

Treatment length varies from patient to patient depending many factors.  Very recently, Genya discharged a patient that had been with her for an extended period of time recovering from a massive shoulder injury. “It was an emotional experience for both of us, lots of laughing, crying, and hard work.  She now has full range of motion and a healthily functioning shoulder. She is pain free and active again.  I am so proud of our work together!”

Our New Williamsburg Facility.

If you have shoulder soreness, tightness or an injury call us directly for a free evaluation. We offer free consultations and direct access to all of our facilities including our brand new state of the art center at 490 Driggs Avenue in Williamsburg, Brooklyn.


The Schroth Method for Scoliosis

 
The Schroth Method for scoliosis utilizes a three dimensional approach to elongate the trunk and correct imbalances of the spine. The goal is to develop the inner muscles of the rib cage in order to change the shape of the upper trunk and to correct any spinal abnormalities.

Developed by Katharina Schroth

The Schroth Method was originally developed by Katharina Schroth in Germany. The method uses customized exercises to return the body’s posture to a more natural position. It is standard treatment for scoliosis in many European countries, and is gaining trust and popularity in the United States.

Scoliosis Symptoms

Symptoms of Scoliosis vary. Pain does not always accompany scoliosis. As a result, scoliosis can present in a variety ways such as abnormal trunk lean, uneven rib cage/shoulders or even back pain. If you suspect scoliosis contact your primary care provider. Prior to Schroth treatment, an x-ray is needed as scoliosis can present differently externally due to overlying musculature and does not give us the full picture. So, knowing the bony anatomy allows us to monitor your progress and tailor your treatment to your specific curvature.

Treatment at Park Sports PT

Getting treatment at Park Sports PT means you are working with certified therapists trained in the Schroth Method. They are partners in your health and wellness. Your therapist will create a personalized plan just for you and your specific condition. Our treatment approach can treat scoliosis patients of all ages. It can also can be utilized to treat in all stages of scoliosis, including after surgery.

Throughout treatment, we look closely at the three-dimensional curve in the spine. We teach patients very specific ways to correct that curve or scoliosis posture. Once patients have recognized their corrected posture, we teach them breathing and muscle activation techniques to hold that correction. Essentially, we help train the motor neurons to sense when they’re in a corrected posture versus when they’re in their scoliosis posture.

The Schroth Method takes a lot of repetition and commitment from the patient to learn these techniques. That’s why home exercises are also recommend at least five days a week for a half hour each time.

Trial results show improved patient outcomes

Several trials have found that physical therapy scoliosis-specific exercises lead to improved patient outcomes. This includes less pain and improved muscular strength, muscular endurance and self-image. In one study, spinal deformity improved in 69 percent of patients who completed Schroth exercises. This compared to only 6 percent in patients who did not complete their exercises. The Schroth Method at Park Sports PT works.

Your Park Sports PT team will create a personalized plan and will help prepare you to work on your strength and posture at home. The result is long term care and a stronger and healthier body.

Contact Us

If you or your child has any symptoms or have visited your primary care provider and are looking for treatment, contact us today to learn more. We are here to help.

Fill out my online form.


Do You Know Why You Have Back Pain? Here’s How You Can Find Out

Are you experiencing low back pain and not sure why? You’re not alone, in fact: 9 out of 10 patients don’t know the primary source of their back pain. The problem is that most people seek treatment after they’ve begun exhibiting symptoms of back pain. While this may seem logical on the surface, here at Park Sports Physical Therapy we encourage our patients to take a more preventative approach to their wellness. At Park Sports, we understand how bothersome it may be to have the stress of back pain added to your daily life. Whether you are just trying to get through the work day, cleaning up after your children, or just taking a walk to get the paper, we know how much worse back pain could make these simple everyday tasks and want to help prevent it. We care about our community and hope to help prevent injuries before they occur/worsen.

The key is to go to a physical therapist before you begin to see the signs and symptoms of back pain. I’m sure that right about now you’re asking, “Why would I do that?” One, because physical therapists are trained to recognize the physical dysfunctions that may one day lead to back pain. And two, because eight out of 10 Americans suffer from low back pain at some point in their lives, so the chances are good that you or someone in our community could become a statistic one day.

Seeing a physical therapist on an annual basis is one of the most effective ways to prevent back pain from occurring in the first place, the way one might see a primary care physician. Doesn’t that sound like the better alternative? Great, now that you’re on board, let’s talk about what you can expect during that annual physical therapy appointment. The first time you go, your physical therapist will collect a complete picture of your medical history. During subsequent visits, it’ll be important to update your physical therapist about any changes to your health during the previous 12 months, but it won’t be necessary to review your entire medical history again.

Next, your physical therapist will perform an examination using a variety of tests and measures including a movement screen. A movement screen is a screening tool that’s designed to identify imbalances in your mobility and stability that may contribute to limited function or other impairments. This gives your PT the ability to see how your back, hips, core, shoulders, knees and ankles perform during a series of carefully selected exercises.

The information gathered during an examination helps your physical therapist to identify changes from one year to the next, a critical step in assessing your risk for back pain and a host of other debilitating conditions. If a problem is identified early enough, then your physical therapist is better equipped to discuss preventive measures instead of designing a treatment plan. And that’s how you identify the root cause of back pain and derail issues before they even begin. Mystery solved.

Our qualified and caring physical therapists here at Park Sports Physical Therapy are here to help! If you feel that you, a loved one, or any residents in the community could benefit from physical therapy please do not hesitate to give us a call at any of our locations in Brooklyn. We have locations in Park Slope, South Slope and Clinton Hill.

Unsure if physical therapy is right for you? Give us a call today and our administrative staff will be happy to accommodate!

Runner’s Injury Prevention Workshop Recap

We want to give a big thank you to all of you who came out to the Runner’s Injury Prevention Workshop. Boris and Julie really enjoyed presenting and getting to know more about your running goals.

Want to keep up to date with our future events, articles, and running tips? Follow us on social media!

Facebook
Twitter
Instagram

Recap

Whether you run recreationally, competitively, or for fitness, the information we shared last night is 100% applicable to you. We covered a lot of material, so we wrote up a brief recap for you and those who couldn’t make it out to our event.

Biomechanics of the Foot

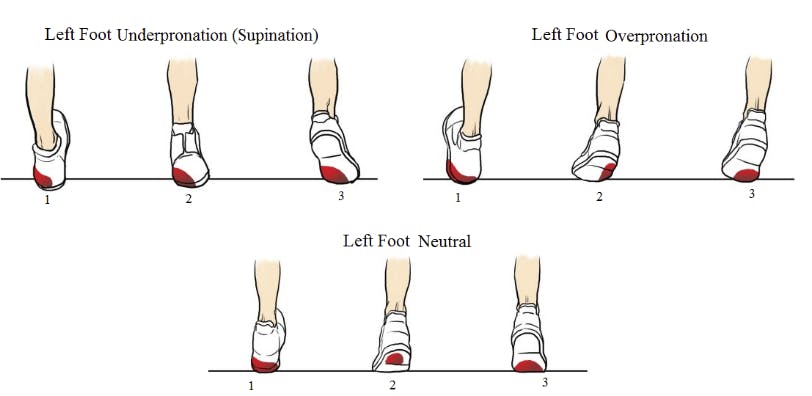
foot pronation and supination chart

Boris and Julie discussed what pronation and supination is and how it can affect your foot if there is a mechanical abnormality. They mentioned individuals’ variations in the foot and ankle structure and how it is connected to the rest of your leg higher up. Other variables play a part in how fast, how long, and efficiently you run. They touched on proper running mechanics and emphasized the form over the speed and distance.

When you run your body experiences impact many times your body weight on each stride. It’s important to understand how your feet land to make the appropriate adjustments. A physical therapist or personal trainer specializing in gait analysis can help in this regard.

The Importance of Core Strength

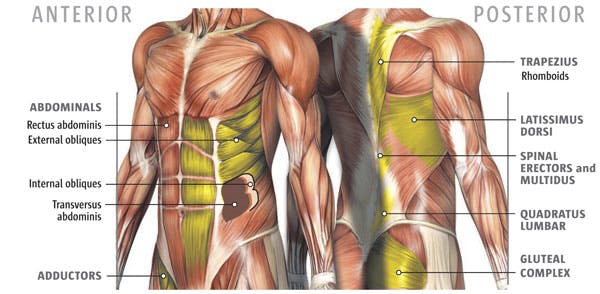
core muscles

One cannot overstate the importance of core strength in any physical activity and this includes running. Your core ensures your body’s stability, balance, proper posture, and control. Strengthening your core comes with many benefits including injury prevention. In regards to running, when your core muscles – your pelvis, abdominal, hips, and back – all work in sync, you are able to remain solid as your foot strikes the ground. If you are a long distance runner, you know how important maintaining proper posture is. A strong core will improve your running time, endurance, stamina, and help reduce the chances of injury.

Strengthening Your Glutes

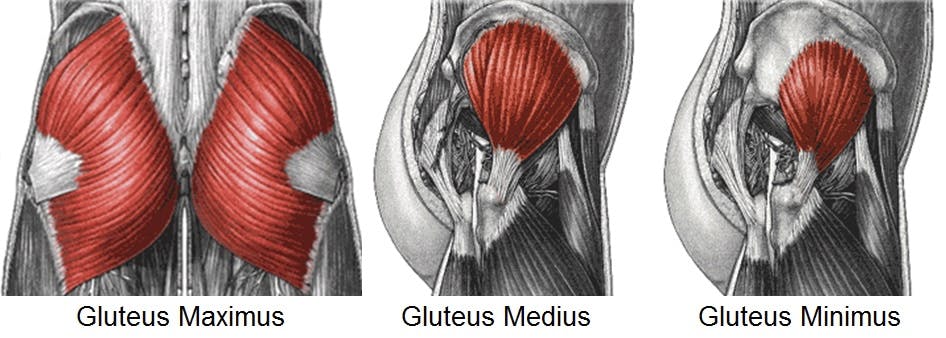
Glutes Breakdown

Your glutes are made up of the gluteus maximus, gluteus medius, and gluteus minimus. They all play an important role during your run. We want to make sure that each of these muscles is strong so that other parts of your body aren’t overcompensating for their lack of engagement.

Your gluteus medius and minimus are abductors and help move your legs away from your body. The gluteus maximus is used for hip extension.

Julie mentioned that too much sitting can lead to weak glutes since they are not activated in that position. On the opposite end, your hip flexors shorten since sitting keeps them in a contracted position. Both Boris and Julie recommend that you do the following exercises:

  • Glute Bridge
  • Lunges
  • Squats
  • Clamshells

Dynamic Stretching

Dynamic Stretching

Although recent research has shown that stretching before a run does not help to prevent injury, there are some benefits to stretchings.

Both Boris and Julie encourage dynamic stretching in which your body is moving while you stretch. This ensures that your muscles are warmed up and ready to go.

Common Tight Spots for Runners

We suggest that you keep a close eye on these parts of the body before, during, and after your run.

  • ITB
  • Achilles
  • Hip Flexors
  • Hamstrings

Plantar Fasciitis

plantar fascitiis

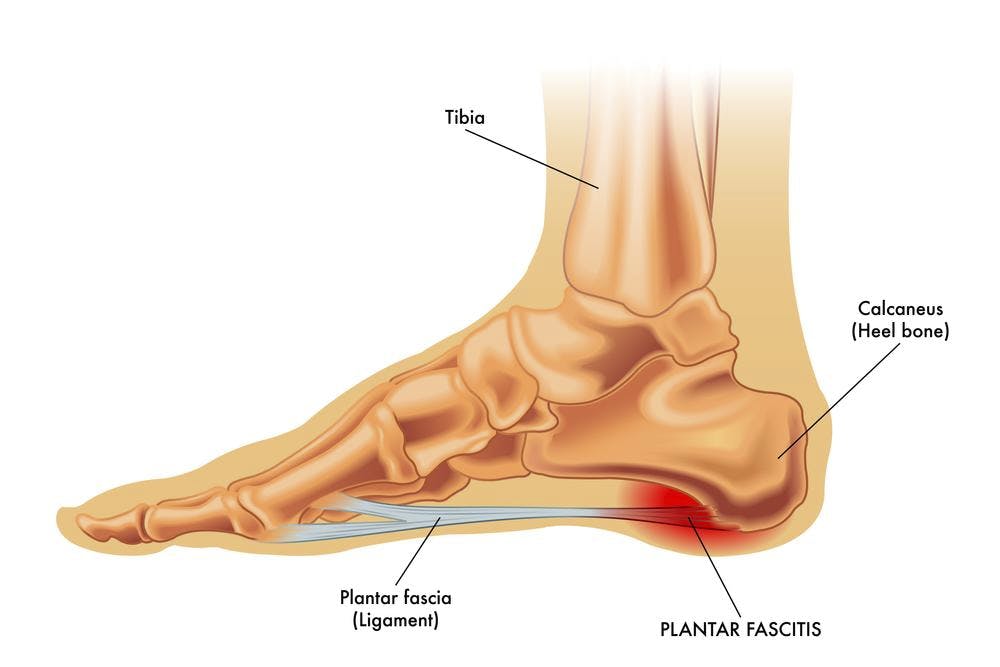
Some of you had concerns about plantar fasciitis. Your plantar fascia is a thin ligament that lies on the bottom of your foot. It connects from the heel all the way to the front of your foot. It helps to support the arch of your foot and plays an important role in walking and running mechanics. If you suffer from heel pain after a run, chances are high that you suffer from plantar fasciitis which is the inflammation of this ligament. Symptoms are described as a shooting pain near the heel. The pain is usually worse in the morning or after long periods of rest.

When you run there is a lot of pressure and force pushed on the plantar fascia. This can cause inflammation and tightness.

There are many factors that can contribute to plantar fasciitis. Tight calf muscles or having a high arch can both play a role in plantar fasciitis. Seeing a physical therapist can help identify these issues and provide a treatment plan to manage pain or prevent pain altogether.

Are you currently experiencing pain from running? Participating in races anytime soon? Our highly trained physical therapists can help.

Running can put a lot of strain and stress on your body. Seeing a physical therapist can help you address any biomechanical issues such as muscle imbalances, gait, or tightness to prevent injury, improve your performance, and keep you running for life.

Fill out the form below to get started.

Fill out my online form.

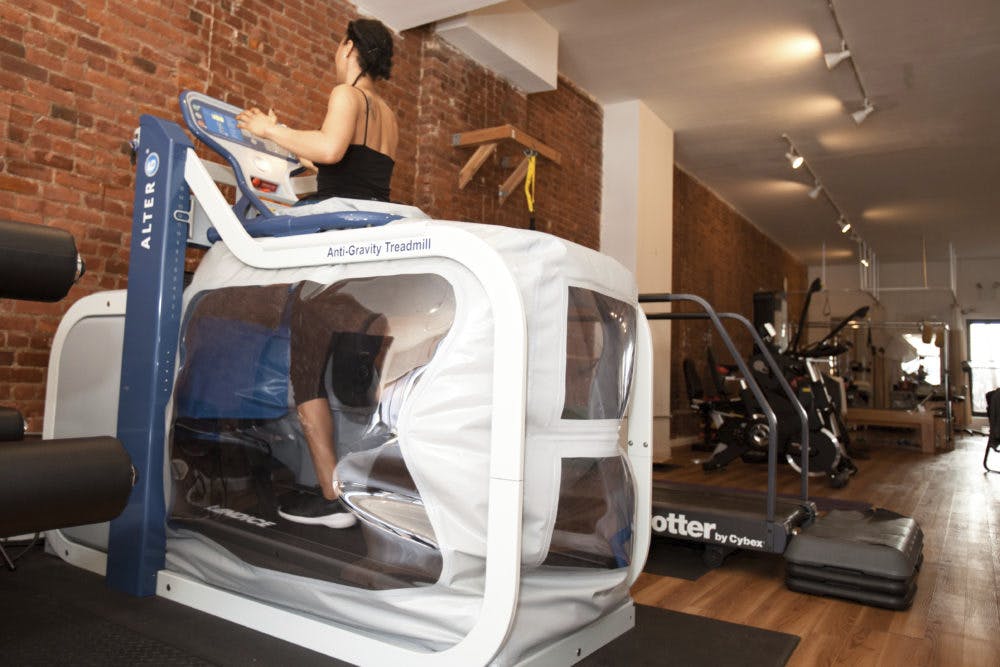
Want to learn more about the AlterG Anti-Gravity Treadmill and give it a try at our Clinton Hill location on Fulton Street? Schedule your first run here.