Addressing Neck, Shoulder and Back Pain with a Scalenes Trigger Point Release at Home

In the context of physical therapy, massage therapy, orthopedics and other clinical settings, you may have heard the term Trigger Point being used to explain the cause of some of your symptoms. Today, we are going to focus on what these trigger points are, how they might contribute to some of the symptoms you may be feeling, and describe in detail a Scalenes trigger point release technique. Why do we care specifically about the Scalenes Muscles? Your scalenes, as we will describe below, are frequent culprits when it comes to neck, shoulder, scapula and arm pain. In addition, they are often affected by anxiety, stress and poor posture, all of which we are dealing with more than ever during these challenging times!

For additional information regarding trigger points, we highly recommend Clair and Amber Davies’s The Trigger Point Therapy Workbook: Your Self-Treatment Guide for Pain Relief.  In addition to more information on the scalenes trigger point release, there you will find excellent descriptions of common trigger points, referred pain patterns, and self-treatment guides.  Unless otherwise specified, most descriptions and images below come from this very helpful resource.

What are “Trigger Points”?

Clinically speaking, the term Trigger Point refers to any painful point that develops within muscle tissue. They can be present within any muscle, and tend to develop after long-term or inappropriate stress is placed on that muscle (see below for examples of stressors). Trigger points can be thought of as “active” or “latent”. Fernández de Las Peñas et al (2017) conducted an international consensus review to establish clinically relevant definitions for “active” versus “latent” points, and came up with the following distinctions:

  • Active Trigger Point: causes a clinical pain complaint
    • Always tender,  and may prevent full muscle lengthening (make your muscles feel tight)
    • Cause muscle weakness
    • When compressed, refers a patient-recognized pain, and/or motor phenomenon (i.e. twitching)
    • When stimulated may cause a local twitch response of muscle fibers compressed within the patient’s pain tolerance
  • Latent Trigger Point: clinically inactive with respect to spontaneous pain
    • Painful only when palpated (meaning “touched” or “pressed on”)
    • May have all the other clinical characteristics of active TPs
    • Always has a taut band that increases muscle tension and restricts range of motion

What are your Scalenes?

The Scalenes are a muscle group that help stabilize, flex (bend forward), laterally flex (tilt the head to the side), and rotate the neck. They also help raise your upper two ribs when you inhale, meaning they are working every time you breathe. However, they work HARDEST during labored breathing, i.e. during vigorous activity, coughing, sneezing, or during periods of anxiety (hence, why they may be more bothersome to some people at this time!)

Where are your Scalenes?

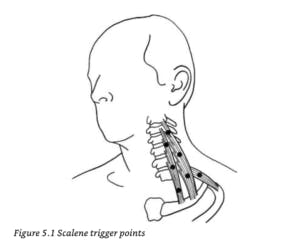
  • Anterior Scalene: the front-most scalene muscle, lies between the SCM (sternocleidomastoid) and the neck vertebrae and is almost completely hidden
  • Middle Scalene: is behind the anterior scalene, more on the side of the neck, with its lower half free of the SCM
  • Posterior Scalene: almost horizontal, behind the middle scalene in a triangular groove just above the collarbone (clavicle) and below the front edge of the upper trapezius (the bulkier muscles that help you shrug your shoulders)

What do Trigger Points in the Scalenes Feel Like?

As described above, trigger points themselves can create a number of different sensations. If you have trigger points throughout your Scalenes that are more active, you may feel some pain or symptoms throughout your shoulder blade/scapula, shoulder joint, side of your arm, forearm and fingers, up to your neck, into your chest, or in a combination of some or all of these locations.

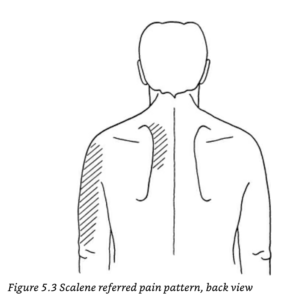
Trigger points in your Scalenes, when pressed on, can produce particularly “strange” sensation, sometimes described as “nervey”, “weird”, “burning” 

What causes the development of trigger points within the Scalenes?

1. Not-So-Great Breathing

Improper breathing patterns such as chest breathing (breathing so that your chest rises with every breath) or nervous hyperventilation will overtax the scalene muscles. Who is prone to these types of breathing patterns?

  • Those experiencing emotional tension, anxiousness or stress (for example, anyone who might currently find themselves in either social isolation OR working in close proximity with ill individuals…).
  • Individuals with chronic respiratory conditions such as asthma or emphysema that make breathing more labored.
  • Individuals with new or worsening respiratory conditions such as pneumonia, bronchitis, allergies, or a common cold that result in constant coughing.

2. Improper Body Positioning

  • Working for long hours with the arms out in front of the body can be very stressful for your Scalenes, including working at your computer. Pulling, lifting, and carrying heavy loads can also cause stress, including rearranging heavy furniture or an intense day of spring cleaning.
  • Carrying a heavy grocery bags or backpacks.
  • Maintaining improper posture – your Scalenes are largely responsible for managing the weight of the head, which is quite heavy! Any posture you assume where your head is not supported, or that puts your head in front of or behind your upright torso creates an imbalance and puts an additional burden on them.

So, what can you do at home to address symptoms that might be caused by Scalenes Trigger Points?

First, try to adjust some of the habits that might be creating them in the first place:

  • Focus on proper diaphragmatic breathing. Diaphragmatic breathing refers to breathing so that your belly rises with every breath instead of your chest or shoulders. This type of breathing is often used during meditation and relaxation sessions and can help with mental as well as physical stress. This video from Mass General Hospital helps demonstrate good diaphragmatic breathing technique.
  • Focus on maintaining good, neutral posture in sitting, standing and sleeping positions. To do this while sitting and standing, you can think about “reaching” your head straight up towards the ceiling, almost as if it is being pulled up by an invisible thread – feel yourself “creating space” in between each vertebrae as you elongate your spine. While lying down, focus on giving your head and legs proper support so that your spine, head and hips remain as aligned as possible. For some quick tips, you can watch this video, or feel free to reach out to a Physical Therapist for a more targeted consultation!


Next, try a Scalenes Trigger Point Release technique!

STOP – CONTRAINDICATIONS: Before moving onto the technique, it is important for us to make you aware of some of the reasons you should not continue. We always recommend consulting with a healthcare professional before attempting any self-release technique if there is a possibility of fracture, nerve damage, cardiovascular disease or blood vessel compromise in the area you plan to massage. If you have been through a recent physical trauma or accident, or have experienced any of the following symptoms, do not attempt this technique, and seek medical attention:

  • Dizziness and/or unsteadiness
  • Diplopia (double vision or visual field loss)
  • Dysarthria/dysphasia (difficulty speaking or finding the right words)
  • Dysphagia (difficulty swallowing or sudden hoarseness of voice)
  • Drop attacks (sudden collapse without loss of consciousness)
  • Nystagmus (uncontrolled sideways movement of the eyes)
  • Nausea or vomiting
  • Numbness or paraesthesia (altered light touch sensation), particularly around the mouth


Scalenes Self-Trigger Point Release Technique 

In order to fully address any pain or symptoms that might be coming from scalenes trigger points, it is important to move as methodically as possible through all 3 major branches of the scalenes: Anterior, Middle & Posterior. Below we have described how to find each branch and perform your self-release technique. 

General Guidelines:

  • Clip or file your fingernails prior to starting this technique – long nails are not your friend when digging into the side of your neck!
  • Use short strokes in either a straight line, no more than half an inch long, or in small circular strokes, both performed with 1-2 fingers. For hard to reach places, feel free to use a lacrosse ball or tennis ball (this applies more to techniques being used for muscles of the back, hips and legs that are bulkier and/or harder to reach with your hands).
  • Make sure you focus on performing strokes at multiple points throughout each muscle, instead of focusing on just one point over and over. 
  • Focus on performing 10-12 strokes per tender spot, 3-6 times per day
  • When pressing on a trigger point, you should feel no more than a 4 or 5 on a scale of 1-10 pain, 1 being very minimal pain, 10 being “emergency room level pain” or “the worst pain you have ever felt”
  • If you can feel your pulse under your fingers, do not press down! You have found your carotid or subclavian pulses, which are great for helping you know you are alive, but not great for finding places to press down hard.
  • Don’t be too concerned about getting the massage exactly right. As long as you are aware of and adhere to the contraindications listed above, pay attention to your symptoms and pain level, avoid pressing on pulse points, and check-in with how you are feeling before and after your self-treatment, it is highly unlikely that you will cause yourself any harm! That being said, if you feel at all uncomfortable with performing this technique, or have additional questions you’d like answered before trying it out, feel free to reach out to a Physical Therapist for help!
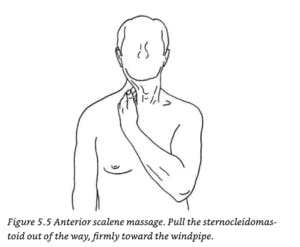
Anterior Scalene

  1. Get your fingers between the neck vertebrae and the sternocleidomastoid (SCM) – the SCM will feel like a “rope of muscle” that runs from your ear down to your sternum.
  2. Grip the SCM between the fingers and thumb, of the opposite hand, as if you were going to massage it. 
  3. Let go with your thumb and with your fingers pull the entire SCM about two inches toward the windpipe. 
  4. With your fingers, press directly back – this should pin the anterior scalene against your vertebral column in order to create nice pressure underneath your fingertips.

Middle Scalene

  1. Repeat steps 1-3 above.
  2. Starting just below your ear, press into the side of your neck. You may feel some “bony knobs” under your fingertips – these are the transverse processes (or sides) of your vertebrae. You want to make sure that you are in front of these knobs. Otherwise, you are likely massaging muscles in the back of your neck (which, to be fair, is not bad at all, but just not what you are looking to do right now).
  3. You can confirm that you are in the right position by quickly taking a few short, repeated breaths – you should feel the muscle twitching below your fingers. 
  4. On the side of the neck here, use the same stroke you used for the anterior scalene. 
  5. Follow this muscle all the way from just below the ear down to the middle of the collarbone.
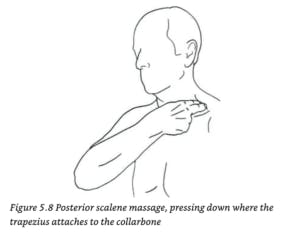
Posterior Scalene

  1. Push your middle finger under the front edge of the trapezius muscle near where it attaches to the collarbone. 
  2. Press downward and drag your finger an inch or so toward your neck in a short, straight line parallel to your collarbone. In this case, the bone you might feel under your fingers is your first rib.


Feel free to try this Scalenes trigger point release out at any point throughout your day. If you have any questions or comments, certainly feel free to reach out! We are open for new visits and telehealth sessions to address your needs throughout this time.  Thanks for reading!

References:

Davies, Clair. The Trigger Point Therapy Workbook: Your Self-Treatment Guide for Pain Relief (A New Harbinger Self-Help Workbook) (p. 101). New Harbinger Publications. Kindle Edition. 

Fernaindez De Las Penas, C., & Dommerholt, J. (2017). International Consensus on Diagnostic Criteria and Clinical Considerations of Myofascial Trigger Points: A Delphi Study. Pain Medicine, 19(1), 142-150. doi:10.1093/pm/pnx207

Also, feel free to read up on more helpful techniques at home, such as Telehealth for Brooklyn-based Physical Therapy and Increasing Shoulder Range of Motion.

Increasing Shoulder Range of Motion

Increasing shoulder range of motion after injury or surgery is key to recovery and shoulder performance. Genya Royfman, PT, DPT is a graduate of UC Santa Barbara and received her Doctorate of Physical Therapy from Hampton University. She’s been a part of the Park Sports team for about a year now and has a passion for treating shoulder injuries. Genya, who is a former high school football player and currently an avid rock climber, has herself had multiple shoulder surgeries and experiences with PT as a patient. When it comes to shoulder issues and recovery, Genya says clearly, “I can relate.”

GENYA ROYFMAN, PT, DPT

The Shoulder and injury.

The shoulder is a complex joint built to allow movement in many directions: forward, backward, around in a circle, and away from the body. Muscles and ligaments help keep the shoulder stable and secure in your shoulder socket. Injuries can occur whether you are an athlete, super active, or an occasionally active weekend adventurer or DIYer.

Quick overview of your shoulder.

Your shoulder joint is a ball-and-socket joint. The head of the humerus (upper arm bone) is the ball and the scapula (shoulder blade) forms the socket where the humerus sits.

The scapula and arm are connected to the body by multiple muscle and ligament attachments. The front of the scapula is also connected to the clavicle or collarbone through what is called the acromioclavicular joint.

As you move your arm around your body, your scapula must also move to maintain the ball and socket in normal alignment. Keeping this alignment steady and sturdy is a life long challenge.  Injury to the multiple muscles and ligaments that keep everything functioning is quite common. Recovery is not always so simple however.

Range of Motion.

Shoulder Range of Motion or ROM is the measurement of movement around a specific joint or body part. ROM can become limited due to joint overuse, arthritis, or sudden trauma to the joint.  Lack of ROM is a strong indicator of injury, not to mention, it can limit your daily functions and cause persistent pain and discomfort. Working with a physical therapist, you will increase your range of motion and strengthen your joint. This occurs through joint manipulation and specialized exercises.

Like all Park Sports therapists, Genya performs detailed research into her client’s history and current injury before any treatment begins. After Genya creates a plan for her patient’s shoulder injury treatment or post-op plan in conjunction with her patient’s surgeon, often she is initially focused on strengthening scapula involvement. “I make sure the scapula is properly engaged, people tend to forget about the shoulder blade.” There are a number of early stage treatment exercises she typically begins with.  These will help work the scapula and also test early treatment ROM.

Shoulder Blade Squeezes.

It is important to engage the upper trapezius muscles at the start of treatment. Genya’s shoulder blade squeezes address the mid to lower trap muscles. As a result, they loosen the upper trap muscles. This helps to relieve neck and shoulder discomfort. Your trap muscle consists of three parts and has many different functions—lifting your shoulders, holding up your neck and head and moving your shoulder blade. When this muscle is tight, it affects your entire body. Tight traps are significant enough to influence your training, recovery, and overall well being.

Scapular Wall Slide.

The Scapular Wall Slide is another early stage exercise designed to improve scapula stabilization. Genya positions her patient in front of a wall and squeezes their shoulder blades.  The patient then slides their forearm up the wall maintaining contact with the wall the entire time. Wall slides train the muscles surrounding the scapula for both dynamic and static stability – controlling the position of the scapula during arm movement.

Treatment length varies.

Treatment length varies from patient to patient depending many factors.  Very recently, Genya discharged a patient that had been with her for an extended period of time recovering from a massive shoulder injury. “It was an emotional experience for both of us, lots of laughing, crying, and hard work.  She now has full range of motion and a healthily functioning shoulder. She is pain free and active again.  I am so proud of our work together!”

Our New Williamsburg Facility.

If you have shoulder soreness, tightness or an injury call us directly for a free evaluation. We offer free consultations and direct access to all of our facilities including our brand new state of the art center at 490 Driggs Avenue in Williamsburg, Brooklyn.


Shoulder Injuries: The Rotator Cuff

Shoulder injuries and pain are frequent complaints we encounter at Park Sports Physical Therapy. There are many factors involved in the diagnosis of shoulder pain. A skillful clinician looks at the whole picture – your posture, the entire kinetic chain including your core and lower extremities musculature, the spinal alignment and most importantly, your shoulder blade mechanics. After all, shoulder pain is most often just a manifestation of a deeper problem.

One problem we often see concerns shoulder injuries to the Rotator Cuff.

Rotator Cuff Tendinitis

Shoulder injuries to the Rotator cuff such as Rotator Cuff tendinitis affects the tendons and muscles that help move your shoulder joint. It is often preceded by the shoulder impingement syndrome, when the tendons of the rotator cuff get “squeezed” by the bony elements. It is a result of faulty mechanics during shoulder elevation, which leads to irritation and inflammation of the tendon and eventually to tendinitis. This condition usually occurs over time and reflects a certain athletic lifestyle or profession that requires repetitive arm and shoulder movement.
Sometimes rotator cuff tendinitis can occur without any known cause. Most people with rotator cuff tendinitis are able to regain full function of the shoulder without any pain.

Symptoms

The symptoms of rotator cuff tendinitis tend to get worse over time. Initial symptoms may be relieved with rest, but the symptoms can later become constant. Symptoms that go past the elbow usually indicate another problem.

Some symptoms include:

  • Pain and swelling in the front of your shoulder and side of your arm
  • pain triggered by raising or lowering your arm
  • a clicking sound when raising your arm
  • stiffness
  • pain that causes you to wake from sleep
  • pain when reaching behind your back
  • a loss of mobility and strength in the affected arm

Rotator Cuff Tears

There are two kinds of rotator cuff tears. A partial tear is when the tendon that protects the top of your shoulder is frayed or damaged. The other is a complete tear. A complete tear goes all the way through the tendon or pulls the tendon off the bone.

Physical Therapy Treatment

If you have a shoulder injury to the rotator cuff such as rotator cuff tendinitis or a rotator cuff tears, you’re not alone. It happens to millions of people every year. It’s a common cause of shoulder pain. The right treatment can make you feel better, keep a small injury from getting worse, and help you heal. For many people, physical therapy (PT) is the answer. It may be all you need to treat an injured rotator cuff.

At Park Sports our program includes personalized exercise, monitored application of ice and heat, detailed massage from a trained specialist, and specific equipment to help return your shoulder back to its normal range of motion. Our role is not just to treat your pain. We want to help you get back to doing the things you enjoy pain free and with a new understanding of how your body functions to help reduce future injury.

According to WebMd, “one study shows that people who got PT for a rotator cuff tear did just as well as those who had surgery.”

Surgery

If nonsurgical treatment isn’t successful, your doctor may recommend surgery. Most people experience full recovery after having rotator cuff surgery. We also treat many patients after rotator cuff surgery to help them recover quickly and in a way that sustains their health and the healthy future of their rotator cuff.

Please contact us for more information about Park Sports and rotator cuff injuries.

Park Sports PT is a Participating Member of the Hospital for Special Surgery Rehabilitation Network.

Fill out my online form.

Shoulder Impingement Syndrome Treatment

Written by Nicole Liquori, DPT
Edited by Alex Ariza

In this article, we take a look at the process of one of our sports rehabilitation therapists, Nicole Liquori, DPT. From the initial evaluation to the treatment plan to the patient’s progress throughout, we will get to see and understand the physical therapist’s perspective. On the flip side, we’ll also get to see the patient’s point of view.

Conrad arrived at our facility with complaints of pain and loss of range of motion in his right shoulder. In early 2017, Conrad had been in a swimming accident which left him with transient paralysis. He regained full function of his arms and legs within a few weeks of the accident but was left with the residual weakness of both upper and lower extremities.

Upon evaluation, Conrad demonstrated signs and symptoms consistent with a diagnosis of shoulder impingement syndrome. Conrad presented with rounded shoulders and weakness of his postural and rotator cuff musculature which can strongly affect the mechanical relationship of all joints associated with shoulder mobility.

Conrad’s symptoms included pain and restricted motion when lifting his arm above head and reaching behind his back.

Our treatment initially focused on restoring his normal shoulder and scapular range of motion (as compared to his left shoulder) using mobilization, soft tissue work and passive/active assistive range of motion. Once we were able to establish the normal glenohumeral rhythm – the coordinated motion of the scapula and humerus experienced during shoulder movement – we moved into scapular and rotator cuff strengthening and stabilization activities.

We focused on functional movements that would translate into his activities of daily living (i.e., reaching for a cup in a high cabinet), as well as recreational activities (i.e., throwing a ball, swimming, etc.).

Conrad’s treatment was cut short secondary to surgery on his spine, but prior to discharge, Conrad had returned to performing most everyday tasks, as well as throwing a ball overhand without pain.

In Conrad’s Own Words

I highly recommend Nicole Liquori at Park Sports PT. After a serious accident, I was unable to raise my arm over my head. I couldn’t throw a ball or swim with an overhand stroke. Nicole changed that in the space of two months. A combination of deep massage, passive movement and guided exercises brought back pain-free use of my shoulder. Her knowledge is apparent in her explanations of the functional basis for the exercises. Her skill is demonstrated in her wonderful touch. She confidently employs just the right amount of force in the right places. On top of that, Nicole is sympathetic and encouraging. She has all the qualities of a first-rate therapist and she helped me immensely.

Conrad L.

Do you currently suffer from Shoulder Impingement Syndrome? We can help. Schedule your appointment today.

Fill out my online form.

Frozen Shoulder Treatment – Regaining Mobility Through Physical Therapy

Written by Edward Umheiser, PT, DPT
Edited by Alex Ariza

Injuries to the shoulder are fairly common in everyday life. Strains and sprains resulting from repetitive activities such as throwing a ball or twisting your arm while reaching behind your car seat happen all the time, and usually heal on their own in only a few days. But what happens if your shoulder suddenly starts to lose its normal range of motion for an unexplained reason?

In this article, I would like to talk about the diagnosis known as adhesive capsulitis, more commonly referred to as frozen shoulder.

What is Frozen Shoulder?

Frozen shoulder is a fairly common diagnosis, but is not well understood and does not always have a known cause. Many people develop frozen shoulder following a surgical procedure to the shoulder, or after an injury that results in the shoulder needing to be immobilized for a short period of time. However, in some cases, some people develop symptoms with no known trigger.

The symptoms are fairly clear-cut – a marked loss of normal range of motion and stiffness of the shoulder joint that may or may not be accompanied by pain.

This shoulder stiffness affects motion in all directions such as reaching up in the air or trying to place the hand behind the back or behind the head. Adhesive capsulitis begins as an inflammatory process within the shoulder and leads to scar tissue formation which can restrict shoulder motion.

For some people, this scar tissue formation can lead to pain in the shoulder joint, especially with movement and during the evening hours while trying to sleep.

The Stages of Frozen Shoulder

Physical Therapist, Edward Umheiser, DPT treating patient with frozen shoulder.
Physical Therapist, Edward Umheiser, DPT treating a patient with frozen shoulder.

There are several stages of frozen shoulder each with their own unique characteristics:

Inflammatory Stage

The inflammatory stage lasts approximately three months and is characterized by pain with shoulder movement in most directions. Pain is often sharp with movement at the end of the range, and there is an ache at rest. Pain is also commonly felt at night, making it difficult to fall asleep.  The range of motion may still be normal at this early stage.

Freezing Stage

Edward Umheiser, DPT measures the shoulder's range of motion.
Edward Umheiser, DPT measures the shoulder’s range of motion.

The freezing stage typically lasts 3-9 months. This is when flexibility of the shoulder begins to reduce due to pain. At this time, people often begin to notice difficulty reaching overhead, or reaching behind their back. This stage, known as the frozen stage, is when the stiffness is most severe. The inflammatory process inside the shoulder joint is starting to decrease at this stage so pain is lessened or non-existent. Over the past several months a thick layer of scar tissue has formed around the shoulder capsule, which makes it difficult to move. This is the stage when most people are diagnosed with frozen shoulder.

Thawing Stage

Edward Umheiser, DPT treating a patient with frozen shoulder. With consistent physical therapy sessions, a patient can begin seeing an increased range of motion.

Finally, the thawing stage is when shoulder motion gradually starts to return to normal. This stage can last anywhere from 9 months to two years and may leave some minor limitations in shoulder range of motion afterward.

Treating A Frozen Shoulder

Edward Umheiser, DPT teaching the patient shoulder exercises.

Physical therapy along with treatment provided by your doctor such as cortisone injections are the first line of defense in reducing the time a patient may experience the symptoms related to a frozen shoulder.

A doctor will typically take some images of the shoulder to rule out other possible structural involvement such as the rotator cuff or the labrum.

At that point, physical therapy treatment 2-3x a week is generally recommended where manual shoulder stretching, massage, mobilization, and exercises are performed to keep the shoulder as pain-free as possible, and to help increase the range of motion.

It is also important to continue to perform the prescribed stretching exercises at home under the guidance of a physical therapist. Generally, the time it takes for a frozen shoulder to “thaw” can be halved under physical therapy treatment. Most patients do not need surgical intervention to correct this diagnosis.

Steps to Take If You Suspect Having a Frozen Shoulder

If you have noticed that you have a lot more difficulty with overhead shoulder motion following a shoulder injury, let your doctor know. If this has persisted for several months, it may be a sign of adhesive capsulitis. An orthopedist can help you make that diagnosis, and physical therapy can help you get onto the road to recovery.

Schedule Your Physical Therapy Appointment Today To Begin Frozen Shoulder Treatment

Fill out my online form.